High-level CLI for Git
Git Town solves the problem that using the Git CLI correctly is cumbersome and repetitive, and therefore many developers don’t use Git to its full potential.
Git isn’t just a version control system; it’s a flexible framework for creating various version control workflows. This flexibility means that most of us end up using ad-hoc workflows, either in our heads or through custom Bash scripts tailored to our needs. These manual workflows often lack proper specifications and don’t handle errors and edge cases well.
Git Town is a reusable implementation of Git workflows for common usage scenarios like contributing to a centralized code repository on platforms like GitHub, GitLab, Bitbucket, Gitea, or Forgejo/Codeberg. Think of Git Town as your Bash scripts for Git, but fully engineered with rock-solid support for many use cases, edge cases, and error conditions.
With Git Town you can keep using Git the way you do now, but with extra commands to create various branch types, keep them in sync, compress, review, and ship them efficiently.
Git Town is compatible with most common branching models like GitHub Flow, Git Flow, GitLab Flow, trunk-based development and even committing straight into the main branch. Git Town has special support for mono-repos and stacked changes. See also this external review.
What our users say
#Gittown you sexy beast! @GitTown
— Elegant Development (@elegant_dev)
Amazing @GitTown rocks! 🚀 https://t.co/S5ouIBx2fe
— Jose Quintana (@joseluis_q)
All doable w/ just git, but git-town is a simpler mental-model and way less keystrokes
— Ryan Nystrom (@_ryannystrom)
I've been using git-town along git-flow for a little while and it's been really nice https://t.co/E5nwHuXP1C
— dan reeves 🏳️🌈 (@dnrvs)
Wow @GitTown looks great, type less git commands for common branch/pr workflows. Similar to @github’s “hub” but looks more powerful, and it logs the fit commands it runs under the hood. pic.twitter.com/PxGs76TS5I
— Gregor (@gr2m)
Supercharge your workflow with Git by relying on this surprisingly powerful and quite useful plugin that provides you with a series of extra Git commands.
Softpedia article about Git Town
Q & A
Does Git Town enforce any specific conventions for branches or commits?
No, Git Town doesn’t impose any rules for branch or commit naming. It works with a wide range of Git branching strategies and workflows. If you find it doesn’t mesh with your specific setup, reach out to us.
Which Git branching models does Git Town support?
Git Town is flexible enough to support the most popular branching models like GitHub Flow, Git Flow, GitLab Flow, trunk-based development. It even works if you commit directly to the main branch!
How is Git Town different from the git-flow tool?
git-flow is a specialized Git extension designed around providing opinionated
support for the Git Flow branching model. It doesn’t help with keeping your
branches or team in sync. Git Town, on the other hand, doesn’t mind which
branching model you use—it focuses on syncing your team’s work and keeping
your repo tidy by cleaning up old branches. You can use Git Town alongside
git-flow if that fits your workflow.
Is Git Town compatible with other Git tools?
Yes, we try to be good citizens in the Git ecosystem. If you run into compatibility issues, please let us know!
Does my whole team have to use Git Town?
No, you can get value from Git Town even if you’re the only one using it. It simply automates the Git commands that you would (should) normally run.
Installation
Git Town ships as a single self-contained binary. It calls the Git executable that is already installed on your machine.
![]()
macOS
You can install Git Town on macOS via Homebrew:
brew install git-town
Installation via MacPorts is also supported:
sudo port install git-town
Windows
You can install Git Town on Windows using:
- Chocolatey:
choco install git-town - Scoop:
scoop install git-town - the Git Town Windows installer
If you use the Windows Subsystem for Linux, please install wsl-open to allow the commands git town repo and git town propose to open a browser window for you.
Linux
On Debian-based systems,
download the .deb file
matching your CPU architecture and run:
sudo apt-get install git-town_linux_intel_64.deb
On RedHat-based systems
download the .rpm file
matching your CPU architecture and run
rpm -i git-town_linux_intel_64.rpm
On Arch Linux, install the git-town package from official package repositories:
pacman -S git-town
On openSUSE Tumbleweed, install the git-town package from the official package repositories:
sudo zypper in git-town
OpenSUSE 15.x and 16.x users can use these steps to install Git Town:
# replace 15.6 with 16.0 in the following command
zypper ar -f -r https://download.opensuse.org/repositories/home:/ojkastl_buildservice:/git-town/15.6/home:ojkastl_buildservice:git-town.repo
zypper refresh # accept the GPG key for the devel:tools:scm repository
zypper install git-town
There are separate packages for the shell completions called
git-town-bash-completion, git-town-zsh-completion, and
git-town-fish-completion.
You can also install Git Town on Linux via Homebrew for Linux:
brew install git-town
You can also install Git Town manually or compile from source.
BSD
You can install Git Town on BSD via freshports or by downloading the matching binaries from the GitHub release.
Manual installation
curl https://www.git-town.com/install.sh | sh
For a fully custom installation,
download the archive matching
your CPU architecture, extract it, and move the git-town executable into a
directory listed in your $PATH, for example /usr/local/bin.
Compile from source
If you have the Go compiler installed, you can compile the latest version of Git Town from source by running:
go install github.com/git-town/git-town/v22@latest
New releases
Subscribe to the Git Town release feed to get notifications about new releases.
Uninstall
To remove Git Town from your system:
- Remove the Git Town configuration from your repositories: in each repo, run
git town config remove - If your operating system or package manager provides an uninstaller for Git Town, run it. If you installed Git Town manually, delete the binary.
Set up configuration
If your repository already contains a git-town.toml, .git-town.toml, or
.git-branches.toml file, you’re all set. If not - or if something isn’t
working as expected - Git Town provides an interactive that guides you through
the entire configuration process. Just run:
git town init
This command walks you through all available configuration options, explains what each one does, lets you adjust them, and validates that everything is working correctly.
For more details on how Git Town handles configuration, see the configuration reference.
API access
Some Git Town features require access the your code forge. This allows Git Town to:
- infer the parent of a branch from open pull requests
- automatically update pull requests when you prepend, rename, or remove branches or change their parent
- trigger pull request merges directly from your terminal
Configuring API access is straightforward. Git Town supports the following platforms:
- GitHub: uses the GitHub CLI. If you prefer not to
install
gh, you can also configure an access token and use Git Town’s built-in GitHub integration. - GitLab: uses the GitLab CLI.
Without
glab, you can configure an access token for Git Town’s built-in GitLab support. - Bitbucket: requires a username and app password
- Gitea: requires an access token
- Forgejo: requires an access token
How To …
This section covers practical tips and workflows for getting the most out of Git Town. Learn how to:
-
Set up shell autocompletion
-
Show the currently interrupted Git Town command in your shell prompt
-
Add a breadcrumb to pull requests
-
Use Git Town with forked repositories
-
Create and propose hotfixes
-
Work with stacked changes
-
Integrate Git Town with LazyGit
-
Sync branch lineage across different repository clones
Disabling the interactive dialogs
Git Town is designed to be an ergonomic interactive command-line application. When it needs additional input, it asks for it directly instead of failing and telling you to re-run with additional flags.
If you prefer a traditional, non-interactive CLI workflow, you can disable these
dialogs by setting the terminal type to dumb when running Git Town:
export TERM=dumb
When this environment variable is set, Git Town suppresses all interactive dialogs and behaves like a conventional CLI tool.
Working with Forked Repositories
Git Town fully supports fork-based workflows. After cloning your fork locally,
add an upstream remote pointing to the original repo you forked from. You can
do this using the Git remote command:
git remote add upstream <Git URL>
Once set up, git town sync will automatically pull in
updates from the upstream repository. When you’re ready to submit your
changes, git town propose creates pull requests from
your fork to the original project.
Creating and shipping hotfixes
Hotfixes differ from regular changes in that they’re based on a different
perennial branch—typically something
like production or staging—and get merged back into that branch.
For example, to create a hotfix from the production branch:
git checkout production
git append my-hotfix
Now, when you run git town sync, it’ll sync your
my-hotfix branch with production instead of the main branch. When you’re
ready to submit the fix, git town propose will create
a pull request from your hotfix branch back into production.
Integrate Git Town with Lazygit
Example lazygit configuration file to integrate Git Town:
customCommands:
  - key: "Y"
    context: "global"
    description: "Git Town sYnc"
    command: "git town sync --all"
    stream: true
    loadingText: "Syncing"
  - key: "U"
    context: "global"
    description: "Git Town Undo (undo the last Git Town command)"
    command: "git-town undo"
    prompts:
      - type: "confirm"
        title: "Undo Last Command"
        body: "Are you sure you want to Undo the last Git Town command?"
    stream: true
    loadingText: "Undoing Git Town Command"
  - key: "!"
    context: "global"
    description: "Git Town Repo (opens the repo link)"
    command: "git-town repo"
    stream: true
    loadingText: "Opening Repo Link"
  - key: "a"
    context: "localBranches"
    description: "Git Town Append"
    prompts:
      - type: "input"
        title: "Enter name of new child branch. Branches off of '{{.CheckedOutBranch.Name}}'"
        key: "BranchName"
    command: "git-town append {{.Form.BranchName}}"
    stream: true
    loadingText: "Appending"
  - key: "h"
    context: "localBranches"
    description: "Git Town Hack (creates a new branch)"
    prompts:
      - type: "input"
        title: "Enter name of new branch. Branches off of 'Main'"
        key: "BranchName"
    command: "git-town hack {{.Form.BranchName}}"
    stream: true
    loadingText: "Hacking"
  - key: "K"
    context: "localBranches"
    description: "Git Town Delete (deletes the current feature branch and sYnc)"
    command: "git-town delete"
    prompts:
      - type: "confirm"
        title: "Delete current feature branch"
        body: "Are you sure you want to delete the current feature branch?"
    stream: true
    loadingText: "Deleting Feature Branch"
  - key: "p"
    context: "localBranches"
    description: "Git Town Propose (creates a pull request)"
    command: "git-town propose"
    stream: true
    loadingText: "Creating pull request"
  - key: "P"
    context: "localBranches"
    description: "Git Town Prepend (creates a branch between the curent branch and its parent)"
    prompts:
      - type: "input"
        title: "Enter name of the for child branch between '{{.CheckedOutBranch.Name}}' and its parent"
        key: "BranchName"
    command: "git-town prepend {{.Form.BranchName}}"
    stream: true
    loadingText: "Prepending"
  - key: "S"
    context: "localBranches"
    description: "Git Town Skip (skip branch with merge conflicts when syncing)"
    command: "git-town skip"
    stream: true
    loadingText: "Skiping"
  - key: "G"
    context: "files"
    description: "Git Town GO aka:continue (continue after resolving merge conflicts)"
    command: "git-town continue"
    stream: true
    loadingText: "Continuing"
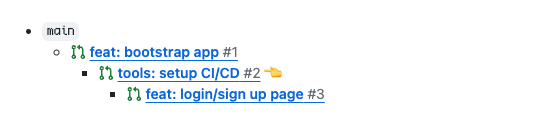
Display a breadcrumb in proposals
Git Town can render a visual breadcrumb in proposals that shows where the current branch sits within its stack. This makes stacked changes explicit and easier to review.
These breadcrumbs are kept up to date automatically when you:
- propose a branch
- sync branches
- ship a branch
- delete a branch
- prepend a branch
- detach a branch
- change the parent of a branch
- merge branches
- swap branches
There are two ways to maintain breadcrumbs. You only need to enable one of them.
Use the Git Town executable
The Git Town CLI can create and update breadcrumbs. This approach works across all supported forges and doesn’t require any CI or workflow changes. Breadcrumbs only get updated if branch changes happen through the Git Town CLI.
To enable this behavior, set proposal-breadcrumb to one of the following values:
branchesto display breadcrumbs for all branchesstacksto display breadcrumbs only for stacks that contain more than one branchnoneto not display breadcrumbs
You can also set proposal-breadcrumb-direction:
downprints the breadcrumb from the root downupprints the breadcrumb from the root up
Use the GitHub action
If your team standardizes on Git Town and uses GitHub, you can set up the Git Town GitHub action to automatically add and update breadcrumbs on all pull requests. This offloads the update workload to CI and ensures breadcrumbs get updated even when changes are made outside the local Git Town CLI.
To enable this behavior, set up the GitHub Action.
Display the currently pending Git Town command in your shell prompt
git town status --pending displays the name of the currently pending Git Town
command. This allows you to have your shell prompt display a reminder when you
need to run git town continue.
Bash
To add this status indicator to your Bash prompt, add the following to your
.bashrc:
function git_town_status {
    local pending_gittown_command=$(git town status --pending)
    if [ -n "$pending_gittown_command" ]; then
      echo -e " \033[30;43m $pending_gittown_command \033[0m "
    fi
}

PS1='$(git_town_status)> '
Zsh
For Zsh, add the following to your ~/.zshrc:
git_town_status() {
  local git_status
  git_status=$(git town status --pending)
  if [[ -n "$git_status" ]]; then
    echo "%K{yellow}%F{black} $git_status %f%k "
  fi
}

setopt PROMPT_SUBST
PROMPT='$(git_town_status)> '
Fish
For Fish shell, update your ~/.config/fish/config.fish and override the
fish_prompt
function:
function fish_prompt
  set -f pending_gittown_command (git-town status --pending)
  if [ -n "$pending_gittown_command" ]
    set -f yellow_pending_gittown_command (set_color -b yellow)(set_color black)(echo " $pending_gittown_command ")(set_color normal)' '
  else
    set -f yellow_pending_gittown_command ''
  end
  printf '%s> ' $yellow_pending_gittown_command
end
Starship.rs
For starship, add this entry to ~/.config/starship.toml :
[custom.git-town]
command = "git town status --pending"
format = "[ $output ]($style)"
style = "bg:yellow fg:black"
when = "test -n \"$(git town status --pending)\" "
Ship several branches in a stack
After you merge the proposal for the oldest branch in a stack, you normally need to sync to propagate the shipped changes through the rest of the stack before you can ship the next branch in the stack. This triggers a CI run for each branch in the stack, which is unnecessary and wasteful because the code hasn’t changed.
You can avoid these unnecessary CI runs by shipping using Git Town’s fast-forward strategy:
git switch <oldest-branch-in-stack>
git ship --strategy=fast-forward
git switch <next-branch-in-stack>
git ship --strategy=fast-forward
...
With fast-forward shipping, Git Town fast-forwards the main branch to include the commits from the shipped branch. Since no commits are rewritten (only branch pointers move), downstream branches in the stack remain in sync and CI doesn’t get triggered.
This only works if the stack is in sync with the main branch, i.e. the main branch hasn’t received new commits since you last synced the stack. If main has new commits, a fast-forward is no longer possible and you must either sync the stack again or ship using a different strategy.
Sync branch lineage across team members or repository clones
Teams using Git Town, as well as individual users working across multiple machines or repository clones, often need a way to share branch lineage.
Git Town supports this via proposals. When you sync a branch and Git Town doesn’t know its parent, it checks your forge for an existing proposal. If it finds one, Git Town uses the proposal’s target branch as the parent.
To automate proposal creation for new branches, set
share-new-branches
to propose.
Commands
Run git town for an overview of all Git Town commands and
git town help <command> for help with individual commands.
Basic workflow
- git town hack - create a new feature branch
- git town sync - update the current branch with all ongoing changes
- git town switch - switch between branches visually
- git town propose - propose to ship a branch
Dealing with errors
- git town continue - continue after you resolved the merge conflict
- git town skip - when syncing all branches, ignore the current branch and continue with the next one
- git town status - display available commands
- git town undo - undo the last completed Git Town command
Stacked changes
- git town append - create a new feature branch as a child
- git town detach - move a branch out of a stack
- git town down - switch to a child of the current branch
- git town diff-parent - show the changes committed to a branch
- git town merge - merges the current branch with its parent
- git town prepend - create a new feature branch between the current branch and its parent
- git town set-parent - change the parent of a feature branch
- git town swap - swap the position of this branch with its parent
- git town up - switch to the parent of the current stack
Limit branch syncing
- git town contribute - stop syncing some feature branches with their parents
- git town observe - stop syncing your contributions to some feature branches
- git town park - suspend syncing some of your feature branches altogether
- git town prototype - sync but don’t push a local feature branch
Git Town setup
- git town completion - generate completion scripts for Bash, zsh, fish & PowerShell.
- git town config - display or update your Git Town configuration
- git town init - setup assistant
- git town offline - enable/disable offline mode
Additional commands
- git town branch - display the local branch hierarchy and types
- git town compress - squash all commits on a branch branches down to a single commit
- git town delete - delete a feature branch
- git town help - help about any command
- git town rename - rename a branch
- git town repo - view the Git repository in the browser
- git town ship - deliver a completed feature branch
Typical development workflow
The following four Git Town commands automate the typical development workflow:
- You start hacking by running git town hack to create a feature branch.
- While coding you run git town sync to keep your feature branch up to date with commits that you or other developers make into the main branch. This prevents your feature branch from deviating too much from the main code line.
- If your team does pull requests, you can run git town propose to create a new pull request.
- git town ship delivers the feature branch.
git town hack
git town hack [<branch-name>...] [--(no)-auto-resolve] [-b | --beam] [-c | --commit] [-d | --(no)-detached] [--dry-run] [-h | --help] [(-m | --message) <message>] [--propose] [-p | --prototype] [--(no)-stash] [--(no)-sync] [-v | --verbose]
The hack command (“let’s start hacking”) creates a new feature branch with the given name off the main branch and brings all uncommitted changes over to it.
Consider this stack:
main
 \
  branch-1
   \
*   branch-2
We are on the branch-2 branch. After running git hack branch-3, our
workspace contains these branches:
main
 \
  branch-1
   \
    branch-2
 \
* branch-3
If your Git workspace is clean (no uncommitted changes), it also
syncs the main branch to ensure you develop on top of the current
state of the repository. If the workspace is not clean (contains uncommitted
changes), git town hack does not perform this sync to let you commit your open
changes.
Upstream remote
If the repository contains a remote called upstream, it also syncs the main
branch with its upstream counterpart. You can control this behavior with the
sync-upstream flag.
Options
--auto-resolve
--no-auto-resolve
Disables automatic resolution of phantom merge conflicts.
-b
--beam
Moves (“beams”) one or more commits from the current branch to the new feature branch that gets created. Lets you select the commits to beam via a visual dialog. Beaming suppresses all branch updates. Any merge conflicts encountered while beaming arise from moving the beamed commits.
-c
--commit
When given, commits the currently staged changes into the branch to create and remains on the current branch. This is intended to quickly commit changes unrelated to the current branch into another branch and keep hacking on the current branch. Committing suppresses all branch updates to allow you to get your open changes committed.
-d
--detached
--no-detached
The --detached aka -d flag enables
detached mode for the current command. If detached
mode is enabled through configuration data, the
--no-detached flag disables detached mode for the current command.
In detached mode, feature branches don’t receive updates from the perennial branch at the root of your branch hierarchy. This can be useful in busy monorepos.
--dry-run
Use the --dry-run flag to test-drive this command. It prints the Git commands
that would be run but doesn’t execute them.
-h
--help
Display help for this command.
-m <text>
--message <text>
Commit message to use together with --commit. Implies --commit.
--propose
Propose the created branch.
To always propose new branches, set the
share new branches setting to propose.
-p
--prototype
Adding the --prototype aka -p switch creates a
prototype branch.
--stash
--no-stash
Enables or disables stashing for this invocation.
--sync
--no-sync
Enables or disables automatic syncing before creating the new branch.
-v
--verbose
The --verbose aka -v flag prints all Git commands run under the hood to
determine the repository state.
Configuration
If the configuration setting
new-branch-type is set, git town hack
creates a branch with the given type.
If share-new-branches is configured,
git town hack creates a remote tracking branch and optionally a
proposal for the new feature branch. This behavior is disabled by
default to make git town hack run fast. The first run of git town sync will
create the remote tracking branch.
See also
- append creates the new branch as a child of the current branch
- prepend creates the new branch as a parent of the current branch
git town sync
git town sync [-a | --all] [--(no)-auto-resolve] [-d | --(no)-detached] [--dry-run] [--gone] [-h | --help] [-p | --prune] [--(no)-push] [-s | --stack] [-v | --verbose]
The sync command (“synchronize this branch”) updates your local Git workspace with what happened in the rest of the repository.
You can (and should) sync all branches many times per day without thinking about it, even in the middle of ongoing work. If a sync goes wrong, you can safely go back to the exact state you repo was in before the sync by running git town undo.
- pulls and pushes updates from all parent branches and the tracking branch
- deletes branches whose tracking branch was deleted at the remote if they contain no unshipped changes
- removes commits of deleted branches from their descendent branches, unless when using the merge sync strategy.
- safely stashes away uncommitted changes and restores them when done
- does not pull, push, or merge depending on the configured branch type
If the parent branch is not known, Git Town looks for a pull/merge request for this branch and uses its parent branch. Otherwise it prompts you for the parent.
Sync frequently
Merge conflicts are not fun and can break code. Minimize them by making it a
habit to sync your branches regularly and frequently. When properly configured,
git town sync --all can synchronize all your local branches the right way
without losing changes, even in edge cases.
If you don’t sync because:
- you don’t want to pull in new changes from the main branch: sync detached.
- you don’t want to increase pressure on your CI server: sync without pushing or indicate in your commit messages to CI to skip test runs
Why does Git Town sometimes not sync the tracking or parent branch?
Git Town detects whether there are any changes that need to be synced, and might skip unnecessary sync operations that wouldn’t produce any changes.
Why does Git Town sometimes update a local branch whose tracking branch was deleted before deleting it?
If a remote branch was deleted at the remote, it is considered obsolete and
git town sync will remove its local counterpart. To guarantee that this
doesn’t lose unshipped changes in the local branch, git town sync needs to
prove that the branch to be deleted contains no unshipped changes.
The easiest way to prove that is when the local branch was in sync with its
tracking branch before Git Town runs git fetch. This is another reason to run
git town sync regularly.
If a local shipped branch is not in sync with its tracking branch on your machine, Git Town must check for unshipped local changes by diffing the branch to delete against its parent branch. Only branches with an empty diff can be deleted safely. For this to work, Git Town needs to sync the branch first, even if it’s going to be deleted right afterwards.
Options
-a
--all
By default this command syncs only the current branch. The --all aka -a
parameter makes Git Town sync all local branches.
--auto-resolve
--no-auto-resolve
Disables automatic resolution of phantom merge conflicts.
-d
--detached
--no-detached
The --detached aka -d flag enables
detached mode for the current command. If detached
mode is enabled through configuration data, the
--no-detached flag disables detached mode for the current command.
In detached mode, feature branches don’t receive updates from the perennial branch at the root of your branch hierarchy. This can be useful in busy monorepos.
--dry-run
Use the --dry-run flag to test-drive this command. It prints the Git commands
that would be run but doesn’t execute them.
--gone
Sync all local branches whose tracking branch is gone. This removes all local branches that were shipped or deleted at the remote.
-h
--help
Display help for this command.
-p
--prune
The --prune aka -p flag removes (prunes) empty branches, i.e. branches that
effectively don’t make any changes.
--push
--no-push
The --push/--no-push argument overrides the
push-branches config setting.
-s
--stack
The --stack aka -s parameter makes Git Town sync all branches in the stack
that the current branch belongs to.
-v
--verbose
The --verbose aka -v flag prints all Git commands run under the hood to
determine the repository state.
Configuration
sync-perennial-strategy configures whether perennial branches merge their tracking branch or rebase against it.
sync-feature-strategy configures whether feature branches merge their parent and tracking branches or rebase against them.
If the repository contains a Git remote called upstream and the
sync-upstream setting is enabled, Git Town
also pulls new commits from the upstream’s main branch.
sync-tags configures whether Git Town syncs Git tags with the development remote.
See also
When you run into merge conflicts:
- continue allows you to resume the suspended Git Town command after you have resolved the merge conflicts by re-running the failed Git command
- skip ignores all remaining merge conflicts on the current branch and then continues the currently suspended Git Town command
- undo aborts the currently suspended Git Town command and undoes all the changes it did, bringing your Git repository back to the state it was before you ran the currently suspended Git Town command
git town switch
git town switch [<branch-name-regex>...] [-a | --all] [(-d | --display-types) <type>] [-h | --help] [-m | --merge] [(-o | --order) <asc|desc>] [--(no)-stash] [(-t | --type) <name>] [-v | --verbose]
The switch command displays the branch hierarchy on your machine and allows switching the current Git workspace to another local Git branch using VIM motion commands. It can filter the list of branches to particular branch types and regular expression matches.
git town switch reminds you about uncommitted changes in your workspace in
case you forgot to commit them to the current branch.
Positional arguments
git town switch interprets all positional arguments as regular expressions.
When receiving regular expressions from the user, it displays only the branches
that match at least one of the regular expressions.
As an example, assuming all your branches start with me-, you can use this
command to switch to one of them:
git town switch me-
To display all branches starting with me- and the main branch:
git town switch me- main
Options
-a
--all
The --all aka -a flag also displays both local and remote branches.
-d <branch-types>
--display-types <branch-types>
This flag allows customizing whether Git Town also displays the branch type in addition to the branch name when showing a list of branches. More info here.
-h
--help
Display help for this command.
-m
--merge
The --merge aka -m flag has the same effect as the
git checkout -m
flag. It attempts to merge uncommitted changes in your workspace into the target
branch.
This is useful when you have uncommitted changes in your current branch and want to move them to the new branch.
-o <asc|desc>
--order <asc|desc>
The --order flag allows customizing the order in which branches get displayed.
More info here
--stash
--no-stash
When set, Git Town stashes the open changes before switching to the new branch and then unstashes them. This guarantees that the switch will work, at the cost of resetting any stashed changes.
-t <name>
--type <name>
The --type aka -t flag reduces the list of branches to those that have the
given type(s). For example, to display only observed branches:
Switch to one of your observed branches:
git town switch --type=observed
Branch types can be shortened:
git town switch -t o
This can be further compacted to:
git town switch -to
You can provide multiple branch types separated by ,, +, &, or |, like
this:
git town switch --type=observed+contribution
This can be shortened to:
git town switch -to+c
-v
--verbose
The --verbose aka -v flag prints all Git commands run under the hood to
determine the repository state.
See also
- branch displays the branch hierarchy
- walk executes a shell command or opens a shell in each of your local branches
git town propose
git town propose [--(no)-auto-resolve] [(-b | --body) <text>] [(-f | --body-file) <path>] [--dry-run] [-h | --help] [-s | --stack] [(-t | --title) <text>] [-v | --verbose]
The propose command helps create a new pull request (also known as merge request) for the current feature branch. It opens your forge’s website to create a new proposal in your browser and pre-populates information like branch and source/target repository. It also syncs the branch to merge before opening the pull request in detached mode.
Proposing prototype and parked branches makes them feature branches.
You can create pull requests for repositories hosted on:
You can configure the browser which Git Town opens using the BROWSER environment variable.
Options
--auto-resolve
--no-auto-resolve
Disables automatic resolution of phantom merge conflicts.
-b <text>
--body <text>
Pre-populate the body of the pull request with the given text.
-f <path>
--body-file <path>
When called with the --body-file aka -f flag, it pre-populates the body of
the pull request with the content of the given file. The filename - reads the
body text from STDIN.
--dry-run
Use the --dry-run flag to test-drive this command. It prints the Git commands
that would be run but doesn’t execute them.
-h
--help
Display help for this command.
-s
--stack
The --stack aka -s parameter makes Git Town propose all branches in the
stack that the current branch belongs to.
-t <text>
--title <text>
When called with the --title <title> aka -t flag, the propose command
pre-populate the title of the pull request to the given text.
-v
--verbose
The --verbose aka -v flag prints all Git commands run under the hood to
determine the repository state.
Configuration
You can configure the forge type with the hosting-platform setting.
When using SSH identities, this command uses the hostname in the hosting-origin-hostname setting.
See also
Error handling
Sometimes Git Town commands encounter problems that require the human user to make a decision. When this happens, the command stops and prints an error message. When you have resolved the issue, you can either:
- run
git town continueto continue executing the interrupted command, starting with the operation that failed, - run
git town undoto undo the Git Town command and go back to where you started.
You can also run git town undo after a Git Town command finished to undo the
changes it made. Run git town status to see the status of the running Git Town
command and which Git Town commands you can run to continue or undo it.
git town continue
git town continue [-h | --help] [-v | --verbose]
When a Git Town command encounters a problem that it cannot resolve, for example a merge conflict, it stops to give the user an opportunity to resolve the issue. Once you have resolved the issue, run the continue command to tell Git Town to continue executing the failed command. Git Town will retry the failed operation and execute all remaining operations of the original command.
Options
-h
--help
Display help for this command.
-v
--verbose
The --verbose aka -v flag prints all Git commands run under the hood to
determine the repository state.
See also
- skip ignores all remaining merge conflicts on the current branch and then continues the currently suspended Git Town command
- undo aborts the currently suspended Git Town command and returns the repository to the state it was in before you ran that command
git town runlog
git town runlog [-h | --help] [-v | --verbose]
Git Town records the SHA of all local and remote branches before and after each command runs into an immutable, append-only log file called the runlog.
The runlog provides an extra layer of safety, making it easier to manually roll back changes if git town undo doesn’t fully undo the changes the last command made.
Options
-h
--help
Display help for this command.
-v
--verbose
The --verbose aka -v flag prints all Git commands run under the hood to
determine the repository state.
See also
- status show displays the runstate, i.e. detailed information for the current or last Git Town command
git town skip
git town skip [-h | --help] [--park] [-v | --verbose]
The skip command allows to skip a Git branch with merge conflicts when syncing all feature branches.
Options
-h
--help
Display help for this command.
--park
When set, also parks the branch to be skipped. This allows you to permanently skip merge conflicts on this branch.
-v
--verbose
The --verbose aka -v flag prints all Git commands run under the hood to
determine the repository state.
See also
- continue tries to continue the currently suspended Git Town command by re-running the Git command that failed.
- undo aborts the currently suspended Git Town command and undoes all the changes it did so far, leaving your repository in the same state it was in before you started the failing Git Town command
git town status
git town status [-h | --help] [-p | --pending] [-v | --verbose]
The status command indicates whether Git Town has encountered a merge conflict and which commands you can run to continue, skip, or undo it.
Subcommands
The reset subcommand deletes the persisted runstate. This is only needed if the runstate is corrupted and causes Git Town to crash.
The show subcommand displays detailed information about the persisted runstate.
Options
-h
--help
Display help for this command.
-p
--pending
The --pending aka -p argument causes this command to output only the name of
the pending Git Town command if one exists. This allows displaying a reminder to
run git town continue into your shell prompt when you encountered a merge
conflict earlier. See here on how to set this up
-v
--verbose
The --verbose aka -v flag prints all Git commands run under the hood to
determine the repository state.
git town status reset
git town status reset [-h | --help] [-v | --verbose]
The status reset command deletes the persisted runstate. This is only needed if the runstate is corrupted and causes Git Town to crash.
Options
-h
--help
Display help for this command.
-v
--verbose
The --verbose aka -v flag prints all Git commands run under the hood to
determine the repository state.
See also
- status show displays the runstate that this command would delete
git town status show
git town status show [-h | --help] [-v | --verbose]
The status show command displays Git Town’s runstate, i.e. detailed information about the currently suspended or previously executed Git Town command, including its path on the filesystem.
Options
-h
--help
Display help for this command.
-v
--verbose
The --verbose aka -v flag prints all Git commands run under the hood to
determine the repository state.
See also
- runlog displays an overview of the most recently executed Git Town commands
- status reset deletes the runstate. This can solve errors after upgrading Git Town.
git town undo
git town undo [-h | --help] [-v | --verbose]
The undo command reverts the last fully executed Git Town command. It performs the opposite activities that the last command did and leaves your repository in the state it was before you ran the problematic command.
Options
-h
--help
Display help for this command.
-v
--verbose
The --verbose aka -v flag prints all Git commands run under the hood to
determine the repository state.
See also
- continue continues the currently suspended Git Town command after you have resolved the conflicting changes
- skip ignores all remaining merge conflicts on the current branch and then continues the currently suspended Git Town command
Stacked changes
Stacked changes let you implement and review complex work as a series of smaller, focused feature branches that build on top of each other.
Key benefits of stacked changes:
- Developers and reviewers maintain momentum and block each other less
- Large, complex changes are broken into smaller, easier-to-review parts
- Merge conflicts are reduced by shipping already approved parts separately from work still under review
Implementing a complex change as a stack of branches requires running a lot more Git commands. Git Town provides first-class support for stacked changes and automates this extra work for you.
Example
Suppose you are adding a new feature to an existing codebase. Before we can do that cleanly, you need to prepare the code base:
- Refactor the architecture to make it easier to add the new feature cleanly
- Clean up technical drift: rename variables, functions, etc
- Build the feature on top of the improved codebase
Putting all these changes into one feature branch is risky. The refactor in (1) touches many files that other people may also be changing. We want to review and merge this quickly to minimize conflicts. The feature in (3) might take longer to build. Both changes should therefore live in separate branches.
However, the feature in (3) depends on (1) and (2). We need to develop them together while reviewing them independently. This is a perfect use case for stacked branches.
Branch 1: refactor
Start by creating a branch for the refactor:
git town hack 1-refactor
git town hack creates a new feature branch off the main
branch. Implement the refactor and commit your changes.
Branch 2: rename foo
Next, perform some renames that depend on the refactor. Create a new branch on
top of 1-refactor:
git town append 2-rename-foo
git town append creates a new feature branch on top of the current branch. The resulting lineage looks like this:
main
 \
  1-refactor
   \
*   2-rename-foo
Branch 2-rename-foo now includes the refactor from branch 1. When you open a
PR, Git Town will target 1-refactor automatically, so reviewers see only the
renames, not the refactor diff.
Branch 3: rename bar
This change is independent of renaming foo and may have a different reviewer.
Create another branch on top of 2-rename-foo:
git town append 3-rename-bar
The lineage is now:
main
 \
  1-refactor
   \
    2-rename-foo
     \
*     3-rename-bar
Extend the refactoring
While working on 3-rename-bar, you discover another improvement for the
architecture. Add it to 1-refactor:
git commit --down=2
This command does the following things:
- Commit the currently staged changes into
1-refactor - Pulls updates from
1-refactorinto2-rename-foo - Pulls updates from
2-rename-foointo3-rename-bar
Shipping the refactor
Once the refactor is approved, you or somebody else merges this pull request. The stack now looks like this:
main
 \
  1-refactor (the remote branch is gone, the local branch still exists)
   \
    2-rename-foo
     \
*     3-rename-bar
Keeping the stack up to date
We have been at it for a while. Other team members made changes to the codebase as well. We don’t want our local branches to deviate too much from the rest of the codebase, since that leads to merge conflicts later. Let’s get our local Git workspace in sync with the rest of the universe!
git town sync --all
git town sync updates all branches:
- Pulls updates made by other people into our local
mainbranch - Deletes branch
1-refactorfrom our local Git workspace because it was shipped at the remote - Pulls updates from
maininto2-rename-foo - Pulls updates from
2-rename-foointo3-rename-bar
Build the new feature
We can now add the new feature on top of the cleaned-up code base:
git town append 4-add-feature
Now you have a clean, reviewable stack:
- Each change lives in its own branch
- Branches build on top of each other
- All branches get reviewed independently
- git town hack starts a stack by creating its first branch
- git town append extends a stack by adding a branch to its end
- You always ship the oldest branch in the stack
git town synckeeps the stack up to date with other changes made to the codebase
Best practices
One change per branch
The single responsibility principle applies to feature branches just as it does to functions, classes, and modules. Single-responsibility branches are easier to reason about, less likely to conflict, and allow shipping work faster.
When you have an idea that is different from what you currently work on, resist the urge to code it in the current feature branch. Implement it in its own feature, parent, or child branch.
If you can’t create a new branch right now, write your idea down and implement it later.
Avoid unnecessary stacking
Only stack changes that depend on each other. If they don’t, create them as
independent top-level feature branches that have main as their parent. This
setup has the advantage that you can ship any branch in any order.
It’s okay to have multiple stacks.
Keep your stack organized
Branches must be shipped oldest-first. Git Town provides powerful commands to organize the branches in your stack:
- git town hack starts a new stack
- git town append appends a new branch to the end of a stack
- git town prepend inserts a new branch between the current branch and its parent
- git town detach extracts a branch from a stack and makes its own independent stack
- git town swap switches the position of the current branch and its parent in the stack
- git town set-parent changes the parent for the current branch and all its descendents
Navigate your stack efficiently
To help commit the right changes to the right branch, Git Town provides powerful commands to navigate stacks:
- git town branch shows you where you are in the stack hierarchy
- git town switch allows you to jump to any branch using a visual dialog with VIM motions
- git town down switches to the parent branch
- git town up switches to the child branch
- git town walk executes a CLI command or opens an interactive shell on each branch of the stack
Embed the stack lineage into pull requests
The Git Town GitHub Action adds a visual graph of which branch of the stack the pull request is for. This provides context when reviewing changes.
Keep the stack in sync
Stacks are more prone to phantom merge conflicts than stand-alone branches. Run
git town sync --stack or git town sync --all regularly to propagate changes
across your stacks.
Avoid phantom conflicts
Phantom conflicts occur when Git reports a merge or rebase conflict that isn’t a real conflict. They can occur when multiple branches in a stack modify the same line in the same file, and you ship using squash-merges.
After shipping the oldest branch from a stack using a squash-merge, main
contains a new commit with the same changes as the shipped branch but a
different commit hash. When syncing, Git sees the new commit on main and the
commit on the shipped branch as conflicting edits to the same line.
Git Town can detect and automatically resolve many of these phantom conflicts because it tracks the branch hierarchy and understands the relationships between commits.
To minimize phantom conflicts:
-
Sync frequently. In a synced stack, each branch builds directly on top of its parent, so changes are linear and easy for Git to reconcile. Branches in an unsynced stack drift apart, making conflicts more likely.
If syncing takes too long, use –detached and –no-push to speed it up.
-
Enable rerere. Git remembers how you resolved past conflicts and reuses those resolutions automatically.
-
Ship using fast-forward merges. Fast-forwarding keeps commit history between your stack and
mainidentical, avoiding synthetic differences that cause phantom conflicts.- GitLab supports this natively.
- On GitHub, use git town ship with the fast-forward strategy to achieve the same effect. See GitHub’s docs for details.
-
Compress noisy branches. If a branch has too many commits and keeps hitting the same conflicts, compress it to a single commit.
-
Keep branches focused. Small, single-purpose branches make it easier to understand and resolve conflicts, and to see what changed, why, and where.
git town append
git town append <branch-name> [--(no)-auto-resolve] [-b | --beam] [-c | --commit] [-d | --(no)-detached] [--dry-run] [-h | --help] [(-m | --message) <message>] [--propose] [-p | --prototype] [--(no)-push] [--(no)-stash] [--(no)-sync] [-v | --verbose]
The append command creates a new feature branch with the given name as a direct child of the current branch and brings over all uncommitted changes to the new branch.
Consider this stack:
main
 \
* feature-1
We are on the feature-1 branch. After running git town append feature-2, the
repository will have this stack:
main
 \
  feature-1
   \
*   feature-2
If your Git workspace is clean (no uncommitted changes), it also
syncs the current branch to ensure your work in the new branch
happens on top of the current state of the repository. If the workspace contains
uncommitted changes, git town append does not perform this sync to let you
commit your open changes first and then sync manually.
Positional argument
When given a non-existing branch name, git town append creates a new feature
branch with the main branch as its parent.
Options
--auto-resolve
--no-auto-resolve
Disables automatic resolution of phantom merge conflicts.
-b
--beam
Moves (“beams”) one or more commits from the current branch to the new child branch that gets created. Lets you select the commits to beam via a visual dialog. Beaming suppresses all branch updates. Any merge conflicts encountered while beaming arise from moving the beamed commits.
-c
--commit
When given, commits the currently staged changes into the branch to create and remains on the current branch. This is intended to quickly commit changes unrelated to the current branch into another branch and keep hacking on the current branch. Committing suppresses all branch updates to allow you to get your open changes committed.
-d
--detached
--no-detached
The --detached aka -d flag enables
detached mode for the current command. If detached
mode is enabled through configuration data, the
--no-detached flag disables detached mode for the current command.
In detached mode, feature branches don’t receive updates from the perennial branch at the root of your branch hierarchy. This can be useful in busy monorepos.
--dry-run
Use the --dry-run flag to test-drive this command. It prints the Git commands
that would be run but doesn’t execute them.
-h
--help
Display help for this command.
-m <msg>
--message <msg>
Commit message to use together with --commit. Implies --commit.
--propose
Propose the created branch.
To always propose new branches, set the
share new branches setting to propose.
-p
--prototype
Adding the --prototype aka -p switch creates a
prototype branch.
--push
--no-push
The --push/--no-push argument overrides the
push-branches config setting.
--stash
--no-stash
Enables or disables stashing for this invocation.
--sync
--no-sync
Enables or disables automatic syncing of the current branch before appending the new one.
-v
--verbose
The --verbose aka -v flag prints all Git commands run under the hood to
determine the repository state.
Configuration
If share-new-branches is configured,
git town append also creates the tracking branch for the new feature branch.
This behavior is disabled by default to make git town append run fast and save
CI runs. The first run of git town sync will create the remote tracking
branch.
If the configuration setting
new-branch-type is set, git town append
creates a branch with the given type.
See also
- hack creates the new branch as a child of the main branch
- prepend creates the new branch as a parent of the current branch
git town commit
git town commit [-d | --down uint] [--dry-run] [-h | --help] [(-m | --message) <text>] [-v | --verbose]
The commit command takes the currently staged changes and commits them into a different branch in your stack, then synchronizes the result back into your current branch.
This is useful when working with stacked branches. A common scenario is that you’re implementing a feature and realize that part of the work is an independent change, let’s say a refactor, and that part belongs in a different branch because you want it reviewed and shipped independently. Since the feature depends on it, the refactor must live in an ancestor branch.
Your desired branch stack looks like this:
main
 \
  refactor
   \
    feature
Manually switching back and forth between refactor and feature to commit
into the correct branch and move changes around is slow and error-prone.
When using git town commit, you can stay on the feature branch, do the
refactoring there to make sure everything works, and then commit the refactoring
changes directly into the refactor branch. Git Town will automatically sync
the committed changes back into feature, letting you continue where you left
off.
Options
-d uint
--down uint
Commit the staged changes into the ancestor branch that is the given number of generations older than the current branch.
--downand--down=1commit into the parent branch--down=2commits into the grandparent branch--down=3commits into the great-grandparent branch
--dry-run
Print the Git commands that would be executed without actually running them.
-h
--help
Display help for this command.
-m <text>
--message <text>
Set the commit message from the command line, equivalent to git commit -m.
-v
--verbose
Prints all Git commands executed under the hood, used to determine repository state.
See also
- git town prepend –commit
- git town prepend –beam
- git town append –commit
- git town append –beam
- git town hack –commit
- git town hack –beam
git town detach
git town detach [--dry-run] [-h | --help] [-v | --verbose]
The detach command removes the current branch from the stack it is in and makes it a stand-alone top-level branch that ships directly into your main branch.
Consider this stack:
main
 \
  branch-1
   \
*   branch-2
     \
      branch-3
We are on the branch-2 branch. After running git town detach, we end up with
with stack:
main
 \
  branch-1
   \
    branch-3
 \
* branch-2
This is useful when a branch in a stack makes changes that are independent from the changes made by other branches in this stack. Detaching such independent branches removes “noise” from your stack, i.e. reduces it to changes that belong together, and allows you to get more of your changes reviewed and shipped concurrently.
Please ensure all affected branches are in sync before running this command, and remove merge commits by compressing.
Options
--dry-run
Use the --dry-run flag to test-drive this command. It prints the Git commands
that would be run but doesn’t execute them.
-h
--help
Display help for this command.
-v
--verbose
The --verbose aka -v flag prints all Git commands run under the hood to
determine the repository state.
See also
- set-parent move the current branch and its descendents under a different parent
- swap move the current branch up in the stack
git town down
git town down [(-d | --display-types) <type>] [-h | --help] [-m | --merge] [(-o | --order) <asc|desc>] [-v | --verbose]
The down command moves one position down in the current stack by switching to the parent of the current branch. After successfully switching branches, it displays the branch hierarchy to show your new position in the stack.
git town down is useful for navigating stacked changes without needing to
remember branch names or use the interactive switch command.
Examples
Consider this stack:
main
 \
  branch-1
   \
*   branch-2
After running git town down on the branch-2 branch, you end down with this
stack:
main
 \
* branch-1
   \
    branch-2
Options
-d <branch-types>
--display-types <branch-types>
This flag allows customizing whether Git Town also displays the branch type in addition to the branch name when showing a list of branches. More info here.
-h
--help
Display help for this command.
-m
--merge
The --merge aka -m flag has the same effect as the
git checkout -m
flag. It attempts to merge uncommitted changes in your workspace into the target
branch.
This is useful when you have uncommitted changes in your current branch and want to move them down to the parent branch.
-o <asc|desc>
--order <asc|desc>
The --order flag allows customizing the order in which branches get displayed.
More info here
-v
--verbose
The --verbose aka -v flag prints all Git commands run under the hood to
determine the repository state.
See also
- branch displays the branch hierarchy
- swap changes the stack by swapping the position of current branch with its parent
- switch interactively switch between branches
- up moves one position up in the current stack
git town diff-parent
git town diff-parent [--diff-filter <value>] [-h | --help] [--name-only] [-v | --verbose]
The diff-parent command displays the changes made on a feature branch, i.e. the diff between the current branch and its parent branch.
Options
--diff-filter <value>
When set, forwards the given value to git diff –diff-filter.
This allows you to restrict the diff to specific change types (for example, added, modified, or deleted files) using the same semantics as native Git.
-h
--help
Display help for this command.
--name-only
When set, displays only the names of files changed on the current branch. It suppresses the diff output and does not show the actual content changes within those files.
-v
--verbose
The --verbose aka -v flag prints all Git commands run under the hood to
determine the repository state.
git town merge
git town merge [--dry-run] [-h | --help] [-v | --verbose]
The merge command merges the current branch into the branch ahead of it in the current stack.
Consider this stack:
main
 \
  branch-1
   \
    branch-2
     \
*     branch-3
       \
        branch-4
We are on the branch-3 branch. After running git town merge, the stack looks
like below, and the new branch-2 branch contains the changes from the old
branch-2 and branch-3 branches.
main
 \
  branch-1
   \
*   branch-2
     \
      branch-4
Both branches must be in sync; run git town sync before running
git town merge. All affected branches must be owned by you, i.e. not be
contribution,
observed, or
perennial branches.
When using the compress sync strategy, the merged branch will contain two separate commits: one per merged branch. This makes it easy to verify that both branches were merged as expected. To consolidate these commits, run git town sync.
Options
--dry-run
Use the --dry-run flag to test-drive this command. It prints the Git commands
that would be run but doesn’t execute them.
-h
--help
Display help for this command.
-v
--verbose
The --verbose aka -v flag prints all Git commands run under the hood to
determine the repository state.
git town prepend
git town prepend [<branch-name>...] [--(no)-auto-resolve] [-b | --beam] [--body <string>] [-c | --commit] [-d | --(no)-detached] [--dry-run] [-h | --help] [(-m | --message) <message>] [--propose] [-p | --prototype] [--(no)-push] [--(no)-stash] [--(no)-sync] [(-t | --title) <text>] [-v | --verbose]
The prepend command creates a new feature branch as the parent of the current branch. It does that by inserting the new feature branch between the current feature branch and it’s existing parent.
Consider this stack:
main
 \
* feature-2
We are on the feature-2 branch. After running git town prepend feature-1,
our repository has this stack:
main
 \
* feature-1
   \
    feature-2
If your Git workspace is clean (no uncommitted changes), it also
syncs the current feature branch to ensure you work on top of the
current state of the repository. If the workspace is not clean (contains
uncommitted changes), git town prepend does not perform this sync to let you
commit your open changes.
If the branch you call this command from has a proposal, this command updates it. To do so, it pushes the new branch.
Options
--auto-resolve
--no-auto-resolve
Disables automatic resolution of phantom merge conflicts.
-b
--beam
Moves (“beams”) one or more commits from the current branch to the new parent branch that gets created. Lets you select the commits to beam via a visual dialog. Beaming suppresses all branch updates. Any merge conflicts encountered while beaming arise from moving the beamed commits.
--body <string>
Pre-populate the body of the pull request to create with the given text.
Requires --propose.
-c
--commit
When given, commits the currently staged changes into the branch to create and remains on the current branch. This is intended to quickly commit changes unrelated to the current branch into another branch and keep hacking on the current branch. Committing suppresses all branch updates to allow you to get your open changes committed.
-d
--detached
--no-detached
The --detached aka -d flag enables
detached mode for the current command. If detached
mode is enabled through configuration data, the
--no-detached flag disables detached mode for the current command.
In detached mode, feature branches don’t receive updates from the perennial branch at the root of your branch hierarchy. This can be useful in busy monorepos.
--dry-run
Use the --dry-run flag to test-drive this command. It prints the Git commands
that would be run but doesn’t execute them.
-h
--help
Display help for this command.
-m <text>
--message <text>
Commit message to use together with --commit. Implies --commit.
--propose
Propose the created branch.
To always propose new branches, set the
share new branches setting to propose.
-p
--prototype
Adding the --prototype aka -p switch creates a
prototype branch.
--push
--no-push
The --push/--no-push argument overrides the
push-branches config setting.
--stash
--no-stash
Enables or disables stashing for this invocation.
--sync
--no-sync
Enables or disables automatic syncing of the current branch before prepending the new one.
-t <text>
--title <text>
Pre-populate the title of the pull request to create with the given text.
Requires --propose.
-v
--verbose
The --verbose aka -v flag prints all Git commands run under the hood to
determine the repository state.
Configuration
If share-new-branches is configured,
git town hack creates a remote tracking branch for the new feature branch.
This behavior is disabled by default to make git town hack run fast. The first
run of git town sync will create the remote tracking branch.
If the configuration setting
new-branch-type is set, git town prepend
creates a branch with the given type.
See also
- append creates the new branch as a child of the current branch
- hack creates the new branch as a child of the main branch
git town set-parent
git town set-parent [<branch>] [--(no)-auto-resolve] [-h | --help] [--none] [-v | --verbose]
The set-parent command moves a branch and all its children below another branch. Consider this stack:
main
 \
  feature-1
   \
*   feature-2
     \
      feature-3

 \
  feature-A
Running git town set-parent feature-A creates this stack:
main
 \
  feature-1

 \
  feature-A
   \
*   feature-2
     \
      feature-3
You can also use set-parent to make a child branch a sibling branch. Consider
this stack:
main
 \
  feature-1
   \
    feature-2
     \
*     feature-3
       \
        feature-4
Running git town set-parent feature-1 creates this stack:
main
 \
  feature-1
   \
    feature-2
   \
*   feature-3
     \
      feature-4
Since set-parent changes commits, your branches must be in sync when running
this command. Run git town sync before running git town set-parent.
After set-parent runs, the affected branches no longer contain changes made by their old parents. However, they don’t see the changes made by their new parent branches yet. Please run git town sync to pull in changes from the new parents.
Positional argument
You can provide the name of the new parent for the current branch as an argument to this command. When called without arguments, queries the user for the new parent.
Options
--auto-resolve
--no-auto-resolve
Disables automatic resolution of phantom merge conflicts.
-h
--help
Display help for this command.
--none
The --none option assigns no parent (removes the assigned parent), making the
branch a perennial branch.
-v
--verbose
The --verbose aka -v flag prints all Git commands run under the hood to
determine the repository state.
See also
- detach extract the current branch from a stack, leaving its children in the stack.
- swap move the current branch up in the stack
git town swap
git town swap [--(no)-auto-resolve] [--dry-run] [-h | --help] [-v | --verbose]
The swap command switches the position of the current branch with the branch ahead of it in the current stack, i.e. moves the current branch one position forward in the stack.
Consider this stack:
main
 \
  branch-1
   \
*   branch-2
     \
      branch-3
After running git town swap on the branch-2 branch, you end up with this
stack:
main
 \
  branch-2
   \
*   branch-1
     \
      branch-3
Moving branches up and down the stack allows you to organize related branches together, for example to review and ship them as a series, or to merge them.
Please ensure that all affected branches are in sync and don’t contain merge commits before running this command, by running git town sync and optionally git town compress before. All affected branches must be owned by you, i.e. you cannot swap contribution, observed, or perennial branches.
Options
--auto-resolve
--no-auto-resolve
Disables automatic resolution of phantom merge conflicts.
--dry-run
Use the --dry-run flag to test-drive this command. It prints the Git commands
that would be run but doesn’t execute them.
-h
--help
Display help for this command.
-v
--verbose
The --verbose aka -v flag prints all Git commands run under the hood to
determine the repository state.
See also
- detach extracts the current branch from a stack, leaving its children in the stack.
- set-parent moves the current branch and its descendents under a different parent
git town up
git town up [(-d | --display-types) <type>] [-h | --help] [-m | --merge] [(-o | --order) <asc|desc>] [-v | --verbose]
The up command moves one position up in the current stack by switching to a child of the current branch. After successfully switching branches, it displays the branch hierarchy to show your new position in the stack.
When the current branch has multiple children, an interactive dialog lets you choose which child branch to switch to.
git town up is useful for navigating stacked changes without needing to
remember branch names or use the interactive switch command.
Examples
Consider this stack:
main
 \
* branch-1
   \
    branch-2
After running git town up on the branch-1 branch, you end up with this
stack:
main
 \
  branch-1
   \
*   branch-2
Options
-d <branch-types>
--display-types <branch-types>
This flag allows customizing whether Git Town also displays the branch type in addition to the branch name when showing a list of branches. More info here.
-h
--help
Display help for this command.
-m
--merge
The --merge aka -m flag has the same effect as the
git checkout -m
flag. It attempts to merge uncommitted changes in your workspace into the target
branch.
This is useful when you have uncommitted changes in your current branch and want to move them up to a child branch.
-o <asc|desc>
--order <asc|desc>
The --order flag allows customizing the order in which branches get displayed.
More info here
-v
--verbose
The --verbose aka -v flag prints all Git commands run under the hood to
determine the repository state.
See also
- branch displays the branch hierarchy
- down moves one position down in the current stack
- swap changes the stack by swapping the position of current branch with its parent
- switch interactively switch between branches
git town walk
git town walk [<command and arguments>] [-a | --all] [--dry-run] [-h | --help] [-s | --stack] [-v | --verbose]
The walk command (“walking the branch hierarchy”) executes a given command for each feature branch. It stops if the command exits with an error, giving you a chance to investigate and fix the issue.
- use git town continue to retry the command on the current branch
- use git town skip to move on to the next branch
- use git town undo to abort the iteration and undo all changes made
- use git town status reset to abort the iteration and keep all changes made
If no shell command is provided, drops you into an interactive shell for each branch. You can manually run any shell commands, then proceed to the next branch with git town continue
Examples
Consider this stack:
main
 \
  branch-1
   \
*   branch-2
     \
      branch-3
Running git town walk --stack make lint produces this output:
[branch-1] make lint
# ... output of "make lint" for branch-1

[branch-2] make lint
# ... output of "make lint" for branch-2

[branch-3] make lint
# ... output of "make lint" for branch-3
Options
-a
--all
Iterate through all local branches.
--dry-run
Test-drive this command: It prints the commands that would be run but doesn’t execute them.
-h
--help
Display help for this command.
-s
--stack
Iterate through all branches of the stack that the current branch belongs to.
-v
--verbose
Print all Git commands executed under the hood to determine the repository state.
See also
- branch displays the branch hierarchy and highlights the currently checked out branch in it
- switch displays the branch hierarchy and lets you select a branch to switch to
Branch types
Git Town supports many different types of Git branches. Branch types affect how
branches are getting synced. When properly configured, you can run
git town sync or git town sync --all at any time and each of your local
branches will get synced in the specific ways it’s supposed to get synced or not
synced. Here is an overview of the various branch types that Git Town
distinguishes.
| branch type | description | syncing behavior | ship |
|---|---|---|---|
| main | primary development branch (“main”, “master”) | sync with origin, pull from upstream | no |
| perennial | long-lived branch for GitOps (“develop”, “staging”) | sync with origin | no |
| feature | normal feature branch | sync with parent and tracking branch | yes |
| prototype | work-in-progress feature | sync with parent, don’t push to tracking | yes |
| parked | inactive feature branch | no syncing | yes |
| contribution | somebody else’s branch, share your changes | sync with tracking | no |
| observed | somebody else’s branch, don’t share your changes | pull from tracking | no |
Main branch
The main branch is a perennial branch from which feature branches get cut by default. The main branch contains the latest development version of your codebase.
Feature branches
Feature branches are the branches on which you typically make changes. They are typically cut from the main branch and get merged back into it. You can also cut feature branches from any other branch type if needed. Feature branches sync with their parent and tracking branch.
Perennial branches
Perennial branches are long-lived branches. They have no parent and are never
shipped. Typical perennial branches are main, master, development,
production, staging, etc. Perennial branches often correspond with a cloud
environment of the same name (GitOps).
Contribution branches
Contribution branches are for people who contribute commits to somebody else’s
feature branch. You cannot propose or
ship contribution branches because those are
responsibilities of the person owning the branch you contribute to. For the same
reason git town sync does not pull updates from the parent branch of a
contribution branch and always
rebases your local commits.
Syncing removes contribution branches from your machine as soon as their
tracking branch is gone, even if you have unpushed local commits.
Deleting a contribution branch only deletes your local
copy and not the tracking branch.
You can make any feature branch a contribution branch by running git town contribute on it. Convert a contribution branch back to a feature branch by running git town hack on it. You can also define a contribution-regex in your Git configuration or the config file.
Observed branches
Observed branches are for people who want to observe the work of somebody else
without contributing commits to it. Similar to contribution branches, you cannot
propose or ship observed branches,
delete only deletes your local copy and not the tracking
branch, git town sync always uses the
rebase sync-feature-strategy and
will remove a local observed branch as soon as its tracking branch is gone, even
if there are unmerged local commits.
Unlike with contributing branches, git town sync does not push your local
commits made to an observed branch to its tracking branch.
You can make any feature branch an observed branch by running git town observe on it. Convert an observed branch back to a feature branch by running git town hack on it. You can also define an observed-regex in your Git configuration or the config file.
Parked branches
Parked branches don’t get synced at all unless you run git town sync directly
on a parked branch. You might want to park a branch if you
- want to intentionally keep the branch at an older state
- don’t want to deal with merge conflicts on this branch right now
- reduce load on your CI server by syncing only your actively developed local branches
You can park any feature branch by running git town park on
it. Unpark a parked branch by running git town hack on it.
Prototype branches
A prototype branch is a local-only feature branch that incorporates updates from its parent branch but is not pushed to the remote repository unless it has a tracking branch. Prototype branches are useful when:
- the branch contains sensitive information, such as secrets, or potentially problematic code or data that could trigger alerts
- the developer prefers to keep their work private from the rest of the team during the initial stages of development
- you want to reduce CI pressure in the early phases of feature development when there isn’t anything to test
Syncing prototype branches follows the sync-prototype-strategy or - if this setting isn’t present - the sync-feature-strategy. This allows you to rebase your commits while working locally, and avoid rebasing when your commits become visible to others.
When you propose a prototype branch, it loses its
prototype status since it now has an official tracking branch that other people
look at. In this situation you can keep syncing without pushes by using the
--no-push sync option.
You can compress and ship prototype branches as usual. When you park a prototype branch or change it into an observed or contribution branch, it loses its prototype status.
To designate any feature branch as a prototype branch, run git town prototype. To convert a prototype branch to a feature branch, run git town hack.
Configuring branch types
You can set the types of indivdiual branches with these commands:
These preferences allow you to configure the types of larger groups of branches:
- feature-regex, and
- new-branch-type,
- perennial-regex preferences.
- unknown-branch-type,
git town contribute
git town contribute [<branch-name>...] [-h | --help] [-v | --verbose]
The contribute command makes some of your branches contribution branches.
When called without arguments, it makes the current branch a contribution branch.
To convert a contribution branch back into a feature branch, use the feature command.
To make the current branch a contribution branch:
git town contribute
Positional arguments
When called with positional arguments, this commands makes the branches with the given names contribution branches.
To make branches “alpha” and “beta” contribution branches:
git town contribute alpha beta
Check out a remote branch (that exists at the development remote but not on your local machine) and make it a contribution branch:
git town contribute somebody-elses-branch
Options
-h
--help
Display help for this command.
-v
--verbose
The --verbose aka -v flag prints all Git commands run under the hood to
determine the repository state.
See also
- feature makes the chosen branches feature branches
- observe makes the chosen branches observed
- park makes the chosen branches parked
- prototype makes the chosen branches prototype branches
git town feature
git town feature [<branch-name>...] [-h | --help] [-v | --verbose]
The feature command makes some of your branches feature branches.
Positional arguments
Make the current branch a feature branch:
git town feature
Make branches “alpha” and “beta” feature branches:
git town feature alpha beta
Check out a remote branch (that exists at the development remote but not on your local machine) and make it a feature branch:
git town feature somebody-elses-branch
Options
-h
--help
Display help for this command.
-v
--verbose
The --verbose aka -v flag prints all Git commands run under the hood to
determine the repository state.
See also
- contribute makes the chosen branches contribution branches
- observe makes the chosen branches feature branches
- park makes the chosen branches parked
- prototype makes the chosen branches prototype branches
git town observe
git town observe [<branch-name>...] [-h | --help] [-v | --verbose]
The observe command makes some of your branches observed branches.
To convert an observed branch back into a feature branch, use the feature command.
Positional arguments
Observe the current branch:
git town observe
Observe branches “alpha” and “beta”:
git town observe alpha beta
Check out a remote branch (that exists at the development remote but not on your local machine) and make it observed:
git town observe somebody-elses-branch
Options
-h
--help
Display help for this command.
-v
--verbose
The --verbose aka -v flag prints all Git commands run under the hood to
determine the repository state.
See also
- contribute makes the chosen branches contribution branches
- feature makes the chosen branches feature branches
- park makes the chosen branches parked
- prototype makes the chosen branches prototype branches
git town park
git town park [<branch-name>...] [-h | --help] [-v | --verbose]
The park command parks some of your branches.
To convert a parked branch back into a feature branch, use the feature command or propose it.
Positional arguments
Park the current branch:
git town park
Park branches “alpha” and “beta”:
git town park alpha beta
Options
-h
--help
Display help for this command.
-v
--verbose
The --verbose aka -v flag prints all Git commands run under the hood to
determine the repository state.
See also
- contribute makes the chosen branches contribution branches
- feature makes the chosen branches feature branches
- observe makes the chosen branches observed
- prototype makes the chosen branches prototype branches
git town prototype
git town prototype [<branch-name>...] [-h | --help] [-v | --verbose]
The prototype command marks some of your branches as prototype branches.
To convert a prototype branch back into a feature branch, use the feature command.
Positional arguments
Make the current branch a prototype branch:
git town prototype
Make branches “alpha” and “beta” prototype branches:
git town prototype alpha beta
Options
-h
--help
Display help for this command.
-v
--verbose
The --verbose aka -v flag prints all Git commands run under the hood to
determine the repository state.
See also
- contribute makes the chosen branches contribution branches
- feature makes the chosen branches feature branches
- observe makes the chosen branches observed
- park makes the chosen branches parked
Configuration commands
Git Town prompts for required configuration information during usage. Git Town
stores its configuration data inside
Git configuration data. You can store
configuration values in the local or global Git configuration depending on
whether you want to share config settings between repositories or not. To see
your entire Git configuration, run git config -l. To see only the Git Town
configuration entries, run git config --get-regexp git-town. The following
commands read and write the configuration entries for you so that you don’t have
to run Git configuration commands manually:
- git town completions - set up shell autocomplete
- git town config - display or update your Git Town configuration
- git town config get-parent - display the name of the parent branch
- git town config remove - remove the Git Town configuration
- git town init - setup assistant for all config settings
- git town offline - enable/disable offline mode
git town completions
git town completions (bash|fish|powershell|zsh) [-h | --help] [--no-descriptions]
The completions command outputs shell scripts that enable auto-completion for
Git Town in Bash, Fish, PowerShell, or Zsh. When set up, typing
git town <tab key> in your terminal will auto-complete subcommands.
Bash
To load autocompletion for Bash, run this command:
source <(git town completions bash)
To load completions for each session, add the above line to your .bashrc.
Fish
To load autocompletions for Fish, run this command:
git town completions fish | source
To load completions for each session, add the above line to your
~/.config/fish/config.fish.
PowerShell
To install autocompletions for PowerShell, run this command:
git town completions powershell | Out-String | Invoke-Expression
To load completions for each session, add the above line to your PowerShell profile.
Zsh
To load autocompletions for Zsh, run this command:
source <(git town completions zsh)
To load completions for each session, add the above line to your .zshrc.
To fix the error message command not found: compdef, run
autoload -Uz compinit
Options
-h
--help
Display help for this command.
--no-descriptions
The --no-descriptions flag outputs shorter completions without descriptions of
arguments.
git town config
git town config [(-d | --display-types) <type>] [-h | --help] [--redact] [-v | --verbose]
The config command displays and updates the local Git Town configuration.
Subcommands
Running without a subcommand shows the current Git Town configuration.
- The get-parent subcommand outputs the parent branch of the current or given branch.
- The remove subcommand removes all Git Town related configuration from the current Git repository.
- The init subcommand launches Git Town’s setup assistant.
Options
-d <branch-types>
--display-types <branch-types>
This flag allows customizing whether Git Town also displays the branch type in addition to the branch name when showing a list of branches. More info here.
-h
--help
Display help for this command.
--redact
When set, does not output sensitive information like tokens.
-v
--verbose
The --verbose aka -v flag prints all Git commands run under the hood to
determine the repository state.
git town config get-parent
git town config get-parent [<branch-name>] [-h | --help] [-v | --verbose]
The config get-parent command outputs the parent branch of the current or given branch.
Options
-h
--help
Display help for this command.
-v
--verbose
The --verbose aka -v flag prints all Git commands run under the hood to
determine the repository state.
git town config remove
git town config remove [-h | --help] [-v | --verbose]
The config remove command removes all Git Town related configuration from the current Git repository.
Options
-h
--help
Display help for this command.
-v
--verbose
The --verbose aka -v flag prints all Git commands run under the hood to
determine the repository state.
git town init
git town init [-h | --help] [-v | --verbose]
The init command launches Git Town’s setup assistant. The setup assistant walks you through all configuration options for Git Town and gives you a chance to adjust them.
Options
-h
--help
Display help for this command.
-v
--verbose
The --verbose aka -v flag prints all Git commands run under the hood to
determine the repository state.
git town offline
git town offline [<status>] [-h | --help] [-v | --verbose]
The offline configuration command displays or changes Git Town’s offline mode. Git Town skips all network operations in offline mode.
Positional arguments
When called without an argument, the offline command displays the current offline status.
When called with yes, 1, on, or true, this command enables offline mode.
When called with no, 0, off, or false, it disables offline mode.
Options
-h
--help
Display help for this command.
-v
--verbose
The --verbose aka -v flag prints all Git commands run under the hood to
determine the repository state.
Additional commands
These Git Town commands allow handling edge cases beyond of the basic development workflow outlined earlier.
- git town delete - delete a feature branch
- git town rename - rename a branch
- git town repo - view the Git repository in the browser
git town branch
git town branch [(-d | --display-types) <branch-types>] [-h | --help] [(-o | --order) <asc|desc>] [-v | --verbose]
The branch command is Git Town’s equivalent of the git branch command. It displays the local branch hierarchy, and the types of all branches except for main and feature branches.
Options
-d <branch-type>
--display-types <branch-type>
This flag allows customizing whether Git Town also displays the branch type in addition to the branch name when showing a list of branches. More info here.
-h
--help
Display help for this command.
-o <asc|desc>
--order <asc|desc>
The --order flag allows customizing the order in which branches get displayed.
More info here
-v
--verbose
The --verbose aka -v flag prints all Git commands run under the hood to
determine the repository state.
See also
- switch displays the branch hierarchy and lets you switch to a new branch in it
- walk executes a shell command or opens a shell in each of your local branches
git town compress
git town compress [--dry-run] [-h | --help] [(-m | --message) <text>] [--no-verify] [-s | --stack] [-v | --verbose]
The compress command squashes all commits on a branch into a single commit.
Assuming you have a feature branch with these commits:
$ git log --format='%s'
commit 1
commit 2
commit 3
Let’s compress these three commits into a single commit:
git town compress
Now your branch has a single commit with the name of the first commit but containing the changes of all three commits that existed on the branch before:
$ git log --format='%s'
commit 1
Git Town compresses feature branches and parked branches. It doesn’t compress perennial, observed, and contribution branches.
Branches must be in sync to compress them; run git push or git town sync
before running this command. This avoids mixing rewriting history with resolving
unrelated merge conflicts.
Options
--dry-run
Use the --dry-run flag to test-drive this command. It prints the Git commands
that would be run but doesn’t execute them.
-h
--help
Display help for this command.
-m <text>
--message <text>
By default the now compressed commit uses the commit message of the first commit
in the branch. You can provide a custom commit message for the squashed commit
with the --message <message> aka -m flag, which works similar to the
-m flag for git commit.
Assuming you have a feature branch with these commits:
$ git log --format='%s'
commit 1
commit 2
commit 3
Let’s compress these three commits into a single commit:
git town compress -m "compressed commit"
Now your branch has these commits:
$ git log --format='%s'
compressed commit
The new compressed commit now contains the changes from the old commit 1,
commit 2, and commit 3.
--no-verify
Disables the pre-commit hook.
-s
--stack
To compress all branches in a stack provide the
--stack aka -s switch.
If you want to compress your commits every time you sync, choose the compress sync strategy for the respective branch type.
Assuming you have a stacked change consisting of two feature branches. Each branch contains three commits.
main
 \
  branch-1
  |  * commit 1a
  |  * commit 1b
  |  * commit 1c
  branch-2
     * commit 2a
     * commit 2b
     * commit 2c
Let’s compress the commits in all branches of this stack:
git town compress --stack
Now your stack contains these branches and commits:
main
 \
  branch-1
  |  * commit 1a
  branch-2
     * commit 2a
As usual, the new commit 1a contains the changes made in branch 1, i.e. the
changes from the old commit 1a, commit 1b, and commit 1c. The new
commit 2a contains the changes made in branch 2, i.e. the changes from the
old commit 2a, commit 2b, and commit 2c.
-v
--verbose
The --verbose aka -v flag prints all Git commands run under the hood to
determine the repository state.
See also
- the compress sync strategy automatically compresses branches when they get synced
git town delete
git town delete [<branch-name>...] [--dry-run] [-h | --help] [-v | --verbose]
The delete command deletes the given branch from the local and if possible the remote repository, removes commits of deleted branches from their descendents (unless when using the merge sync strategy), and updates proposals of child branches to the parent of the deleted branch.
Consider this stack:
main
 \
  branch-1
   \
*   branch-2
     \
      branch-3
We are on the branch-2 branch. After running git town delete we end up with
this stack, on the branch that was active before we switched to branch-2:
main
 \
  branch-1
   \
    branch-3
Git Town deletes only the parts of the branch that you own. If you delete feature, parked, or prototype, it deletes the local and tracking branch. When deleting contribution, observed, or perennial, it deletes only the local branch because you don’t own the tracking branch.
Positional arguments
When called without arguments, the delete command deletes the feature branch you are on, including all uncommitted changes.
When called with a branch name, it deletes the given branch.
Example
Options
--dry-run
Use the --dry-run flag to test-drive this command. It prints the Git commands
that would be run but doesn’t execute them.
-h
--help
Display help for this command.
-v
--verbose
The --verbose aka -v flag prints all Git commands run under the hood to
determine the repository state.
git town help
git town help [-h | --help]
The help command displays detailed information about each Git Town command.
Options
-h
--help
Display help for this command.
git town rename
git town rename [<old-name>] <new-name> [--dry-run] [-f | --force] [-h | --help] [-v | --verbose]
The rename command renames the current branch and its tracking branch. The branch to rename must be fully synced. Updates all affected proposals.
Please be aware that most forges are unable to update the head branch (aka source branch) of proposals. If you rename a branch that already has a proposal, the existing proposal will most likely end up closed and you have to create a new proposal that supersedes the old one. If that happens, Git Town will notify you. Updating proposals of child branches usually works.
Positional arguments
When called with only one argument, the rename command renames the current branch to the given name.
When called with two arguments, it renames the branch with the given name to the given name.
Options
--dry-run
Use the --dry-run flag to test-drive this command. It prints the Git commands
that would be run but doesn’t execute them.
-f
--force
Renaming perennial branches requires confirmation with the --force aka -f
flag.
-h
--help
Display help for this command.
-v
--verbose
The --verbose aka -v flag prints all Git commands run under the hood to
determine the repository state.
git town repo
git town repo [<remote-name>] [-h | --help] [-v | --verbose]
The repo command (“show me the repository”) opens the homepage of the current repository in your browser. Git Town can display repositories hosted on GitHub, GitLab, Gitea, Bitbucket, and Forgejo.
You can configure the browser which Git Town opens using the BROWSER environment variable.
Positional arguments
When called without arguments, the repo command shows the repository at the development remote.
When called with an argument, it shows the repository at the remote with the given name.
Options
-h
--help
Display help for this command.
-v
--verbose
The --verbose aka -v flag prints all Git commands run under the hood to
determine the repository state.
Configuration
Git Town automatically identifies the forge type through the URL of the development remote. You can override the type of hosting server with the hosting-platform setting.
Set the hosting-origin-hostname setting to tell Git Town about the hostname when using ssh identities.
See also
- propose opens the website displaying the pull request for the current branch
git town ship
git town ship [<branch-name>] [--dry-run] [-h | --help] [--(no)-ignore-uncommitted] [(-m | --message) <text>] [(-f | --message-file) <path>] [(-s | --strategy) <name>] [-p | --to-parent] [-v | --verbose]
Notice: Most people don’t need to use this command. The recommended way to
merge your feature branches is to use the web UI or merge queue of your code
hosting service, as you would normally do. git town ship is for edge cases
like developing in offline mode or when shipping
stacked changes.
The ship command (“let’s ship this feature”) merges a completed feature branch into the main branch and removes the feature branch.
The branch to ship must be in sync. If it isn’t in sync, git town ship will
exit with an error. When that happens, run git town sync to get the
branch in sync, re-test and re-review the updated branch, and then run
git town ship again.
To ensure that everything on your branch gets shipped, this command verifies that your workspace contains no uncommitted changes. You can configure this behavior using the ignore-uncommitted setting.
Positional argument
When called without a positional argument, the ship command ships the current branch.
When called with a positional argument, it ships the branch with the given name.
Options
--dry-run
Use the --dry-run flag to test-drive this command. It prints the Git commands
that would be run but doesn’t execute them.
-h
--help
Display help for this command.
--ignore-uncommitted
--no-ignore-uncommitted
Overrides the ignore-uncommitted setting for this call.
-m <text>
--message <text>
Similar to git commit, the --message <message> aka -m parameter allows
specifying the commit message via the CLI.
-f <path>
--message-file <path>
The --message-file aka -f flag uses the content of the given file for the
commit message. The filename - reads the commit message from STDIN.
-s <name>
--strategy <name>
Overrides the configured ship-strategy.
-p
--to-parent
The ship command ships only direct children of the main branch. To ship a
child branch, you need to first ship or delete all its ancestor
branches. If you really want to ship into a non-perennial branch, you can
override the protection against that with the --to-parent aka -p option.
-v
--verbose
The --verbose aka -v flag prints all Git commands run under the hood to
determine the repository state.
Configuration
The configured ship-strategy determines how the ship command merges branches. When shipping stacked changes, use the fast-forward ship strategy to avoid empty merge conflicts.
If you have configured the API tokens for GitHub, GitLab, Gitea, Bitbucket, or Forgejo and the branch to be shipped has an open proposal, this command merges the proposal for the current branch.
If your forge automatically deletes shipped branches, for example GitHub’s feature to automatically delete head branches, you can disable deleting remote branches.
See also
- propose creates a pull request for the current branch
- repo opens the website of your forge in the browser, so that you can ship branches there
Git Town configuration file
Git Town can be configured through a configuration file named git-town.toml, .git-town.toml, or .git-branches.toml. To create one, run:
git town init
Here is an example configuration file with the default settings:
[branches]
main = "" # must be set by the user
contribution-regex = ""
default-type = "feature"
feature-regex = ""
observed-regex = ""
perennial-regex = ""
perennials = []

[create]
branch-prefix = ""
new-branch-type = "feature"
share-new-branches = "no"

[hosting]
dev-remote = "origin"
origin-hostname = "" # use the hostname in the origin URL
forge-type = "" # auto-detect

[propose]
breadcrumb = "none"
breadcrumb-direction = "down"

[ship]
delete-tracking-branch = true
strategy = "api"

[sync]
auto-sync = true
feature-strategy = "merge"
perennial-strategy = "rebase"
prototype-strategy = "rebase"
push-hook = true
tags = true
upstream = true
Preferences
You can see all preferences via the config command and change them via the setup assistant or manually. Configuration data exists on multiple levels:
-
Team-wide configuration settings go into the configuration file. These settings apply to all Git Town users working on the respective repository.
-
Each developer can configure their preferred Git Town settings for all repositories on their machine using global Git metadata. These settings override (1). For example, if I always want to use the
rebasesync-feature-strategy in all my repositories, I would run:git config --global git-town.sync-feature-strategy rebase -
User and repo specific configuration settings go into local Git metadata, which takes precedence over (1) and (2). For example, if I want
rebaseas the default strategy for all my repositories, except in thefoorepo I want to usemerge, I’d first configure the global setting in (2), and then run in thefoorepo:git config git-town.sync-feature-strategy merge -
All config settings can also be overridden via environment variables. For example, to load your GitHub token from the 1Password CLI:
GIT_TOWN_GITHUB_TOKEN=$(op read op://development/GitHub/credentials/personal_token) git town config
Branches
At a high level, Git Town distinguishes long-lived from short-lived Git branches.
Long-lived branches
Branches that live forever are called perennial branches. Typical names for
perennial branches are main, master, development, production, or
staging. Amongst these, the main branch holds a special role: it is the the
default base from which short-lived branches are cut, and into which short-lived
branches are merged.
Short-lived branches
Short-lived branches typically used for active development. They are typically created from a perennial branch and merged back into the same perennial branch. They can also form a hierarchy of branches called a stack. Git Town distinguishes short-lived branches that you own vs those that you don’t own.
Short-lived branches owned by you
- feature branch: a branch that you do work on, Git Town keeps it up to date for you
- prototype branch: an early-stage feature branch, not ready to be pushed to a shared remote
- parked branch: a feature branch you own but aren’t actively working on, Git Town doesn’t sync it to reduce noise
Short-lived branches owned by others
- contribution branches: somebody else’s feature branch that you are contributing code to, but no lifecycle events like sync, ship, or delete
- observed branches: somebody else’s feature branch that you review but aren’t contributing code to
Configuring branch types
Git Town offers powerful configuration settings to automatically classify local branches:
- branches.main: automatically treated as perennial
- branches.perennials explicit list of perennial branches
- branches.perennial-regex all branches matching this regular expression are considered perennial
- branches.contribution-regex: all branches matching this regular expression are considered contribution branches
- branches.observed-regex: all branches matching this regular expression are considered observed branches
- create.new-branch-type defines the type that branches you create via commands like git town hack, append, or prepend
Manually setting branch types
You can override the branch type for each branch using one of these commands:
- git town contribute: mark a branch as a contribution branch
- git town observe: mark a branch as observed
- git town park: mark a branch as parked
- git town prototype: create or convert a branch to a prototype branch
- git town hack: create or convert a branch to a feature branch
Contribution regex
Branches matching this regular expression are treated as contribution branches.
configure in config file
Setting the contribution regex in the config file is only useful when the matching branches should be considered contribution by all team members. This is typically the case for branches generated by external services, like Renovate or Dependabot.
[branches]
contribution-regex = "^renovate/"
configure in Git metadata
To manually set the contribution regex, run this command:
git config [--global] git-town.contribution-regex '^renovate/'
The optional --global flag applies this setting to all Git repositories on
your local machine. When not present, the setting applies to the current repo.
environment variable
You can configure the contribution regex by setting the
GIT_TOWN_CONTRIBUTION_REGEX environment variable.
Display types
This setting allows you to change whether Git Town also displays the branch type in addition to the branch name when showing a list of branches.
Allowed values
- all - display the type for all branches
- no - never display the branch type
- no <branch types> - display the type of all branches unless the branch has one of the listed types
- <branch types> - display the type of the branch only if it matches one of the listed branch types
Examples
no feature maindisplays the type for all branches except for feature and main branches. (This is the default setting.)prototype observed contribution parkeddisplays the type only for these four branch types
Config file
[branches]
display-types = "<value>"
Git metadata
git config [--global] git-town.display-types <push|propose>
The optional --global flag applies this setting to all Git repositories on
your machine. Without it, this setting applies only to the current Git repo.
Environment variable
You can configure the branch types display via the GIT_TOWN_SHARE_NEW_BRANCHES
environment variable.
CLI flags
You can override this setting per command using:
--display-types/-d/--display-types=all: display the type for all branches--display-types=no: never display the branch type--display-types=contribution+observed: display the type only for contribution and observed branches--display-types=no-main-featuredisplays the type for all branches except main and feature branches
Feature regex
Branches matching this regular expression are treated as feature branches. This setting is relevant only when the unknown-branch-type setting is set to something different than “feature”.
configure in config file
In the config file, define the feature regex within
the [branches] section:
[branches]
feature-regex = "^my-*"
configure in Git metadata
To manually set the feature regex, use the following command:
git config [--global] git-town.feature-regex '^user-.*'
The optional --global flag applies this setting to all Git repositories on
your local machine. When not present, the setting applies to the current repo.
environment variable
You can configure the feature regex by setting the GIT_TOWN_FEATURE_REGEX
environment variable.
Main branch
This setting stores the name of the main branch. The main branch is the default parent branch for new feature branches created with git town hack and the default branch into which Git Town ships finished feature branches.
config file
In the config file the main branch is part of the
[branches] section:
[branches]
main = "config-main"
Git metadata
To configure the main branch in Git, run this command:
git config [--global] git-town.main-branch <value>
The optional --global flag applies this setting to all Git repositories on
your machine. Without it, the setting applies only to the current repository.
environment variable
You can configure the main branch by setting the GIT_TOWN_MAIN_BRANCH
environment variable.
Observed regex
Branches matching this regular expression are treated as observed branches.
configure in config file
Setting the observed regex in the config file is only useful when the matching branches should be considered observed by all team members. This is typically the case for branches generated by external services, like Renovate or Dependabot.
[branches]
observed-regex = "^renovate/"
configure in Git metadata
To manually set the feature regex, run this command:
git config [--global] git-town.observed-regex '^renovate/'
The optional --global flag applies this setting to all Git repositories on
your local machine. When not present, the setting applies to the current repo.
environment variable
You can configure the observed regex by setting the GIT_TOWN_OBSERVED_REGEX
environment variable.
Order
This setting allows you to change how Git Town orders branches it displays.
Allowed values:
- asc sort branches in natural sort order, ascending (default)
- desc sort branches in natural sort order, descending
CLI flag
You can override this setting per command using:
--order=ascto force ascending order--order=descto force descending order
config file
[branches]
order = "<asc|desc>"
Git metadata
To enable ordering branches in Git, run this command:
git config [--global] git-town.order <asc|desc>
The optional --global flag applies this setting to all Git repositories on
your machine. Without it, this setting applies to the current Git repo.
environment variable
You can configure branches ordering by setting the GIT_TOWN_ORDER environment
variable.
Perennial branches
Perennial branches are long-lived branches. They have no parent and are never
shipped. Typical perennial branches are main, master, development,
production, staging, etc.
You can see the configured perennial branches via the config command and change them via the setup assistant.
configure in config file
In the config file the perennial branches are
defined as part of the [branches] section:
[branches]
perennials = ["branch", "other-branch"]
configure in Git metadata
You can configure the perennial branches manually by running:
git config [--global] git-town.perennial-branches "branch other-branch"
The optional --global flag applies this setting to all Git repositories on
your machine. Without it, the setting applies only to the current repository.
bulk-define perennial branches
If you have many perennial branches that follow the same naming schema, like
release-v4.0-rev.1, release-v4.0-rev.2, etc, you can define a
regular expression for them instead of listing them one by
one.
environment variable
You can configure the perennial branches by setting the
GIT_TOWN_PERENNIAL_BRANCHES environment variable to a value comparable to
similar Git metadata.
Perennial regex
All branches matching this regular expression are considered perennial branches.
configure in config file
In the config file the perennial regex exists inside
the [branches] section:
[branches]
perennial-regex = "^release-.*"
configure in Git metadata
You can configure the perennial branches manually by running:
git config [--global] git-town.perennial-regex 'release-.*'
The optional --global flag applies this setting to all Git repositories on
your machine. Without it, the setting applies only to the current repository.
environment variable
You can configure the perennial regex by setting the GIT_TOWN_PERENNIAL_REGEX
environment variable.
Unknown branch type
This setting defines the branch type to use when Git Town cannot determine the branch type using all other configuration settings:
- main-branch,
- perennial-branches
- Feature regex
- Contribution regex
- Observed regex
- or a manual branch type override set by git town park, git town contribute, git town hack, git town observe, git town prototype
Possible values are:
feature(default)contributionobservedparkedprototype
configuration via setup assistant
A great way to configure this setting is through the setup assistant.
configure in config file
In the config file, the unknown branch type is
specified in the [branches] section:
[branches]
unknown-type = "feature"
configure in Git metadata
You can manually configure the unknown branch type using Git metadata:
git config [--global] git-town.unknown-branch-type "feature"
The optional --global flag applies this setting to all Git repositories on
your machine. Without it, the setting applies only to the current repository.
environment variable
You can configure the branch type Git Town should assume for unknown existing
branches by setting the GIT_TOWN_UNKNOWN_BRANCH_TYPE environment variable.
Branch prefix
When set, Git Town automatically adds this prefix to branches it creates.
For example, with a branch prefix of kevgo-:
git town hack examplecreates branchkevgo-examplegit town append childcreates branchkevgo-childgit town prepend parentcreates branchkevgo-parentgit town rename otherrenames the current branch tokevgo-other
If the branch name you provide already includes the configured prefix, Git Town
won’t add it again. For instance, with prefix kevgo-, running
git town hack kevgo-example creates kevgo-example (not
kevgo-kevgo-example).
configure in config file
In the config file, define the branch prefix within
the [create] section:
[create]
branch-prefix = "kevgo-"
configure in Git metadata
To manually set the branch prefix, use the following command:
git config [--global] git-town.branch-prefix 'kevgo-'
The optional --global flag applies this setting to all Git repositories on
your local machine. When not present, the setting applies to the current repo.
environment variable
You can configure the branch prefix by setting the GIT_TOWN_BRANCH_PREFIX
environment variable.
If you want to use your GitHub username as the branch prefix, set this environment variable once with a call like this:
export GIT_TOWN_BRANCH_PREFIX=$(gh api user --jq '.login')
New branch type
This setting defines the type for new branches created using the git town hack, append, or prepend commands.
Before setting this, consider one of these more broadly applicable configuration entries:
- contribution-regex
- unknown-branch-type
- feature-regex
- observed-regex
- perennial-branches
- perennial-regex
values
These values make sense for this setting:
feature(default)parkedperennialprototype
config file
To configure the type of new branches in the configuration file:
[create]
new-branch-type = "feature"
Git metadata
To configure the type of new branches in Git metadata, run this command:
git config [--global] git-town.new-branch-type <feature|parked|perennial|prototype>
The optional --global flag applies this setting to all Git repositories on
your machine. Without it, the setting applies only to the current repository.
environment variable
You can configure the new branch type by setting the GIT_TOWN_NEW_BRANCH_TYPE
environment variable.
Share new branches
This setting allows you to change how Git Town shares new branches created with hack, append, or prepend.
Allowed values:
- no/false/0: Don’t share new branches, keep them local on your machine until you sync or propose them (default behavior).
- push: Push new branches to the development remote.
- propose: Create a pull request for the new branch. This is similar to always adding the propose flag.
in config file
create.share-new-branches = "push|propose"
in Git metadata
To enable pushing new branches in Git, run this command:
git config [--global] git-town.share-new-branches <push|propose>
The optional --global flag applies this setting to all Git repositories on
your machine. Without it, this setting applies to the current Git repo.
environment variable
You can configure how new branches get shared by setting the
GIT_TOWN_SHARE_NEW_BRANCHES environment variable.
Stash uncommitted changes
This setting controls whether Git Town stashes uncommitted changes away before creating and switching to a new branch, i.e. affects the hack, append, and prepend commands.
options
By default (true), Git Town stashes your uncommitted changes before creating
the new branch and restores them afterwards. This ensures the branch switch
succeeds, even if there are conflicts that git checkout --merge can’t handle.
The tradeoff is that if you had changes stashed before, those changes are now unstashed. If you carefully staged changes before creating a new branch, you may want to disable this option to keep your index untouched.
CLI flags
You can override this setting per command using:
--stashto force stashing--no-stashto skip stashing
in config file
To permanently disable stashing in the config file:
[create]
stash = false
in Git metadata
You can also configure stashing only on your machine:
git config [--global] git-town.stash <true|false>
The optional --global flag applies this setting to all Git repositories on
your machine. Without it, the setting applies only to the current repository.
environment variable
The GIT_TOWN_STASH environment variable also configures this behavior.
Browser
By default, Git Town launches your system’s default browser by trying common
commands like open, xdg-open, or x-www-browser.
You can override this behavior to use a specific browser. Disable browser
launching entirely by setting (none) as the browser executable.
configure in config file
[hosting]
browser = "<browser executable>"
configure in Git metadata
git config [--global] git-town.browser '<browser executable>'
The optional --global flag applies this setting to all Git repositories on
your local machine. When not present, the setting applies to the current repo.
environment variable
Git Town uses the BROWSER environment variable that is also used by other
tools.
Development remote
This setting lets you override the name of the Git remote used for development.
This is the remote that branches get pushed to, and into which branches get
shipped to. Usually that remote is called origin, which is also the default
value for this setting.
config file
To configure the development remote in the configuration file:
[hosting]
dev-remote = "<remote name>"
Git metadata
To configure the development remote manually in Git, run this command:
git config [--global] git-town.dev-remote <remote name>
The optional --global flag applies this setting to all Git repositories on
your machine. Without it, the setting applies only to the current repository.
environment variable
You can configure the development remote by setting the GIT_TOWN_DEV_REMOTE
environment variable.
Forge Type
To talk to the API of your forge, Git Town needs to know which forge type (GitHub, Gitlab, Bitbucket, gitea, Forgejo, etc) you use.
By default, Git Town determines the forge type by looking at the URL of the development remote. If that’s not successful, for example when using a private forge, you can tell Git Town through this configuration setting which forge type you use.
values
You can use one of these values for the forge type setting:
- remove the entry or leave it empty for auto-detection
githubgitlabgiteabitbucketbitbucket-datacenterforgejoazuredevops(experimental)
config file
In the config file the forge type is part of the
[hosting] section:
[hosting]
forge-type = "<value>"
Git metadata
To configure the forge type in Git, run this command:
git config [--global] git-town.forge-type <value>
The optional --global flag applies this setting to all Git repositories on
your machine. Without it, this setting applies to the current Git repo.
environment variable
You can configure the forge type by setting the GIT_TOWN_FORGE_TYPE
environment variable.
Origin hostname
If you use SSH identities, you can define the hostname of your source code repository with this setting. The given value should match the hostname in your SSH config file.
config file
In the config file the forge is part of the
[hosting] section:
[hosting]
origin-hostname = "<hostname>"
Git metadata
To configure the origin hostname in Git, run this command:
git config [--global] git-town.hosting-origin-hostname <hostname>
The optional --global flag applies this setting to all Git repositories on
your machine. Without it, the setting applies only to the current repository.
environment variable
You can configure the origin hostname by setting the GIT_TOWN_ORIGIN_HOSTNAME
environment variable.
Bitbucket access token
Bitbucket Cloud
Git Town can interact with Bitbucket Cloud in your name, for example to update pull requests as branches get created, shipped, or deleted, or to ship pull requests. To do so, Git Town needs your Bitbucket username and a Bitbucket app password.
An app password is not the password of your Bitbucket account. It’s a special
password that you create so that external applications can interact with
Bitbucket in your name. To create an app password in the Bitbucket web UI, click
on the Settings cogwheel, choose Personal Bitbucket settings, and then in
the menu on the left App passwords. You need to enable these permissions:
- repository: read and write
- pull requests: read and write
Bitbucket Data Center
Git Town can interact with Bitbucket Data Center in your name. To do so, Git Town needs your Bitbucket username and an HTTP access token.
An HTTP access token is not the password of your Bitbucket account. It’s a
special password that you create so that external applications can interact with
Bitbucket in your name. To create an HTTP access token in the Bitbucket web UI,
click on your Profile picture, choose Manage account, and then in the menu on
the left HTTP access tokens. You need to enable these permissions:
- Project read
- Repository write
config file
Since your app password or access token is confidential, you cannot add it to the config file.
Git metadata
You can configure the app password or access token manually by running:
git config [--global] git-town.bitbucket-app-password <token>
The optional --global flag applies this setting to all Git repositories on
your machine. Without it, the setting applies only to the current repository.
environment variable
You can configure the Bitbucket application password by setting the
GIT_TOWN_BITBUCKET_USERNAME environment variable.
Bitbucket username
Git Town can interact with Bitbucket Cloud and Bitbucket Data Center in your name, for example to update pull requests as branches get created, shipped, or deleted. To do so, Git Town needs your Bitbucket username and a Bitbucket app password.
config file
Since usernames are user specific, you cannot add them to the config file.
Git metadata
You can configure the Bitbucket username manually by running:
git config [--global] git-town.bitbucket-username <token>
The optional --global flag applies this setting to all Git repositories on
your machine. Without it, the setting applies only to the current repository.
environment variable
You can configure the Bitbucket username by setting the
GIT_TOWN_BITBUCKET_USERNAME environment variable.
Forgejo token
Git Town can interact with Forgejo-based forges (like Codeberg) in your name, for example to update pull requests as branches get created, shipped, or deleted. To do so, Git Town needs a personal access token.
To create an API token, follow these steps You need an API token with these permissions:
- repository: read and write
config file
Since your API token is confidential, you cannot add it to the config file.
Git metadata
You can configure the API token manually by running:
git config [--global] git-town.forgejo-token <token>
The optional --global flag applies this setting to all Git repositories on
your machine. Without it, the setting applies only to the current repository.
environment variable
You can configure the Forgejo token by setting the GIT_TOWN_FORGEJO_TOKEN
environment variable.
Gitea token
Git Town can interact with Gitea in your name, for example to update pull requests as branches get created, shipped, or deleted. To do so, Git Town needs a personal access token for Gitea.
To create an API token, click on your profile image, choose Settings, and then
in the menu on the left Applications. You need an API token with these
permissions:
- read and write the repository
config file
Since your API token is confidential, you cannot add it to the config file.
Git metadata
You can configure the API token manually by running:
git config [--global] git-town.gitea-token <token>
The optional --global flag applies this setting to all Git repositories on
your machine. Without it, the setting applies only to the current repository.
environment variable
You can configure the Gitea token by setting the GIT_TOWN_GITEA_TOKEN
environment variable.
GitHub connector
Git Town can interact with GitHub in two different ways.
-
GitHub API:
Git Town communicates directly with the GitHub API using a personal access token. You’ll need to generate this token github.com/settings/tokens.By default, Git stores such tokens in plaintext in your Git configuration. To avoid this, consider configuring Git to use your operating system’s encrypted credentials storage for better security.
-
GitHub CLI (gh):
The gh CLI handles authentication and token management for you.
config file
It is generally not recommended to hardcode the connector type in your config
file, as it enforces usage or non-usage of gh for your entire team. If you
want to set it explicitly, it would look like this:
[hosting]
github-connector = "api" # or "gh"
Git metadata
You can configure the API token manually by running:
git config [--global] git-town.github-connector <api|gh>
The optional --global flag applies this setting to all Git repositories on
your machine. Without it, the setting applies only to the current repository.
environment variable
You can configure the GithubConnector by setting the GIT_TOWN_GITHUB_CONNECTOR
environment variable.
GitHub token
Git Town can interact with GitHub in your name, for example to update pull
requests as branches get created, shipped, or deleted. To do so, Git Town needs
a
personal access token
with the repo scope. You can create one in your
account settings or get one created
for you by using the gh connector type.
config file
Since your API token is confidential, you cannot add it to the config file.
Git metadata
You can configure the API token manually by running:
git config [--global] git-town.github-token <token>
The optional --global flag applies this setting to all Git repositories on
your machine. Without it, the setting applies only to the current repository.
environment variable
You can configure the GitHub token by setting the GIT_TOWN_GITHUB_TOKEN
environment variable.
GitLab connector
Git Town can interact with GitLab in two different ways.
-
GitLab API:
Git Town communicates directly with the GitLab API using a personal access token. You’ll need to generate this token at gitlab.com/settings/tokens.By default, Git stores such tokens in plaintext in your Git configuration. To avoid this, consider configuring Git to use your operating system’s encrypted credentials storage for better security.
-
GitLab CLI (glab):
The glab CLI handles authentication and token management for you.
config file
It is generally not recommended to hardcode the connector type in your config
file, as it enforces usage or non-usage of glab for your entire team. If you
want to set it explicitly, it would look like this:
[hosting]
gitlab-connector = "api" # or "glab"
Git metadata
You can configure the API token manually by running:
git config [--global] git-town.gitlab-connector <api|glab>
The optional --global flag applies this setting to all Git repositories on
your machine. Without it, the setting applies only to the current repository.
environment variable
You can configure the GitLab connector by setting the
GIT_TOWN_GITLAB_CONNECTOR environment variable.
GitLab token
Git Town can interact with GitLab in your name, for example to update pull
requests as branches get created, shipped, or deleted. To do so, Git Town needs
a
personal access token
with api scope. You can create one in your account settings.
account settings or
get one created for you by using the
api connector type for GitLab.
config file
Since your API token is confidential, you cannot add it to the config file.
Git metadata
You can configure the API token manually by running:
git config [--global] git-town.gitlab-token <token>
The optional --global flag applies this setting to all Git repositories on
your machine. Without it, the setting applies only to the current repository.
environment variable
You can configure the GitLab token by setting the GIT_TOWN_GITLAB_TOKEN
environment variable.
proposal-breadcrumb
This setting controls whether the Git Town CLI embeds a visual representation of the branch stack (breadcrumbs) into proposals.
If you prefer to handle this outside the CLI, you can achieve the same effect by using the Git Town GitHub Action.
values
This setting accepts the following values:
- none: do not embed breadcrumbs into proposals
- branches: embed breadcrumbs into proposals for all branches
- stacks: emded breadcrumbs only for proposals that are part of a stack with 2 or more branches
config file
[propose]
breadcrumb = "stacks"
Git metadata
To configure whether branches get pushed manually in Git, run this command:
git config [--global] git-town.proposal-breadcrumb stacks
The optional --global flag applies this setting to all Git repositories on
your machine. Without it, the setting applies only to the current repository.
environment variable
You can also configure whether branches get pushed by setting the
GIT_TOWN_PROPOSAL_BREADCRUMB environment variable.
proposal-breadcrumb-direction
Controls the direction of the breadcrumb that Git Town embeds into proposals.
values
Supported values:
- down renders the breadcrumb from the root branch down
- up renders the breadcrumb from the root branch up
Choose the direction that best matches how your team thinks about stacked branches.
config file
[propose]
breadcrumb-direction = "down"
Git metadata
To configure this via Git metadata:
git config [--global] git-town.proposal-breadcrumb-direction down
With --global, the setting applies to all Git repositories on your machine.
Without it, the setting applies only to the current repository.
environment variable
You can also configure this via the environment variable
GIT_TOWN_PROPOSAL_BREADCRUMB_DIRECTION.
Delete tracking branch
Some forges like
GitHub
and
GitLab
can delete the tracking branch when shipping via their API. In this case the
tracking branch is already gone when git town ship tries to delete it,
resulting in an error. To prevent this error, set this setting to false so
that Git Town does not try to delete the tracking branch.
in config file
ship.delete-tracking-branch = true
or
[ship]
delete-tracking-branch = true
in Git metadata
To configure this setting in Git, run this command:
git config [--global] git-town.ship-delete-tracking-branch <true|false>
The optional --global flag applies this setting to all Git repositories on
your machine. Without it, the setting applies only to the current repository.
environment variable
You can configure whether ship deletes the tracking branch by setting the
GIT_TOWN_SHIP_DELETE_TRACKING_BRANCH environment variable.
ignore-uncommitted
By default, Git Town refuses to ship a branch if there are uncommitted changes, ensuring that everything on the branch is included in the ship. This setting allows you to configure this behavior.
options
false(default) requires a clean workspace. This guarantees that all changes on the branch are committed and shipped.trueallows shipping with uncommitted changes, i.e. what CI sees.
via CLI flag
You can override the configured behavior for a single invocation:
git-town ship --ignore-uncommitted
git-town ship --no-ignore-uncommitted
in config file
To configure this behavior permanently, you can configure it in the config file:
[ship]
ignore-uncommitted = true
in Git metadata
You can also configure this setting via Git config:
git config [--global] git-town.ignore-uncommitted <true|false>
The optional --global flag applies this setting to all repositories on your
machine. Without it, the setting applies only to the current repository.
environment variable
You can control this behavior by setting the GIT_TOWN_IGNORE_UNCOMMITTED
environment variable.
env GIT_TOWN_IGNORE_UNCOMMITTED=true git-town ship
Ship strategy
This setting defines how git town ship merges finished feature branches into the main branch.
options
api
When using the “api” ship strategy, git town ship presses the “merge” button for the proposal in the web UI of your forge via an API call.
You need to configure an API token in the setup assistant for this to work.
api is the default value because it does exactly what you normally do
manually.
always-merge
The always-merge ship strategy creates a merge commit via git merge --no-ff.
This strategy allows visually grouping related feature commits together which may aid in understanding project history in certain situations.
It is not generally recommended to revert merge commits, so git town undo will
not create a merge reversal commit if the merge commit has been pushed already.
See
howto/revert-a-faulty-merge.adoc
in the official Git documentation for more information.
fast-forward
The fast-forward ship strategy prevents false merge conflicts when using
stacked changes and allows to
Ship several branches in a stack without unnecessary
CI runs. It runs
git merge –ff-only
which fast-forwards the parent branch to contain the commits of the branch to
ship and then pushes the new commits on the parent branch to the
development remote. This way the parent branch contains the
exact same commits as the branch that has just been shipped.
For details why this is needed check out this GitHub documentation.
This works on GitHub even if your main branch is protected as long as the associated proposal is green and has been approved! GitHub recognizes that the commits you push have already been tested and approved and allows them to be pushed. For more information, see this StackOverflow answer.
A limitation of the fast-forward ship strategy is that your feature branch
must be up to date, i.e. the main branch must not have received additional
commits since you last synced your feature branch.
squash-merge
When set to squash-merge, git town ship merges the
feature branch to ship in your local Git repository. While doing so it squashes
all commits on the feature branch into a single commit and lets you edit the
commit message.
config file
Set the ship strategy in the config file:
[ship]
strategy = "api"
Git metadata
To manually configure the ship strategy in Git metadata, run:
git config [--global] git-town.ship-strategy <always-merge|api|fast-forward|squash-merge>
The optional --global flag applies this setting to all Git repositories on
your machine. Without it, the setting applies only to the current repository.
environment variable
You can configure the ship strategy by setting the GIT_TOWN_SHIP_STRATEGY
environment variable.
auto-resolve
Git Town automatically resolves phantom merge conflicts by default. If you run into a bug related to auto-resolution, please report it and then use this configuration setting to disable auto-resolution as a temporary workaround until the issue is addressed.
CLI flags
In one-off situations you can call commands that update branches with the
--no-auto-resolve flag to disable automatic resolution of phantom merge
conflicts.
If you have automatic resolution disabled permanently via the config file or Git
metadata (see below), you can enable it with the --auto-resolve flag.
config file
To configure automatic resolution of phantom merge conflicts in the configuration file:
[sync]
auto-resolve = false
Git metadata
To configure phantom merge resolution in Git, run this command:
git config [--global] git-town.auto-resolve <true|false>
The optional --global flag applies this setting to all Git repositories on
your machine. Without it, the setting applies only to the current repository.
environment variable
You can configure auto-resolving of phantom merge conflicts by setting the
GIT_TOWN_AUTO_RESOLVE environment variable.
auto-sync
By default, Git Town automatically keeps your branches in sync with each other, for example before creating a new branch. This setting allows you to disable this behavior. When disabled, your branches are no longer automatically synced and you need to run git town sync manually to sync them.
CLI flags
In one-off situations you can call commands that sync branches with the
--no-sync flag to disable automatic syncing.
If you have automatic syncing disabled permanently via the config file or Git
metadata (see below), you can enable it with the --sync flag.
config file
To configure automatic syncing in the configuration file:
[sync]
auto-sync = false
Git metadata
To configure automatic syncing in Git metadata, run this command:
git config [--global] git-town.auto-sync <true|false>
The optional --global flag applies this setting to all Git repositories on
your machine. Without it, the setting applies only to the current repository.
environment variable
You can configure auto-sync by setting the GIT_TOWN_AUTO_SYNC environment
variable.
Detached
This setting configures whether Git Town pulls new commits from the main or perennial branch at the root of your branch hierarchy. This can help if you encounter too many interruptions through expensive recompiles in busy monorepos after syncing.
options
When set to false (the default value), git town sync pulls updates from the
perennial root branch of your stack. When set to true, git town sync does
not pull in changes from the perennial root.
via CLI flag
Commands that sync branches have a --detached CLI flag to enable detached mode
for that invocation. If detached mode is enabled permanently via the
configuration settings described on this page, you can override it for a single
run by with the --no-detached flag.
in config file
The config file can enable detached mode permanently for all commands like this:
[sync]
detached = true
in Git metadata
To enable detached mode permanently for all commands using Git metadata:
git config [--global] git-town.detached <true|false>
The optional --global flag applies this setting to all Git repositories on
your machine. Without it, the setting applies only to the current repository.
environment variable
You can configure whether Git Town syncs Git tags by setting the
GIT_TOWN_DETACHED environment variable.
Feature sync strategy
This setting specifies how to update local feature branches with changes from their parent and tracking branches.
options
merge
When using the “merge” feature sync strategy (which is the default), git town sync merges the parent and tracking branches into local feature branches.
merge is the default value because it is the safest and easiest option.
rebase
When set to rebase, git town sync rebases local feature
branches against their parent branches and then does a safe force-push of your
rebased local commits to the tracking branch. This safe force-push uses Git’s
–force-with-lease
and
–force-if-includes
switches to guarantee that the force-push will never overwrite commits on the
tracking branch that haven’t been integrated into the local Git history.
If the safe force-push fails, Git Town rebases your local branch against its tracking branch to pull in new commits from the tracking branch. If that leads to conflicts, you have a chance to resolve them and continue syncing by running git town continue.
When continuing the sync this way, Git Town tries again to safe-force-push and rebase until the safe-force-push succeeds without removing commits from the tracking branch that aren’t part of the local Git history.
This can lead to an infinite loop if you do an interactive rebase that removes
commits from the tracking branch while syncing it. You can break out of this
infinite loop by doing a less aggressive rebase that doesn’t remove the remote
commits. Finish the git town sync command and then clean up your commits via a
separate interactive rebase after the sync. At this point another sync will
succeed because the commits you have just cleaned up are now a part of your
local Git history.
The rule of thumb is that pulling in new commits via git town sync and
cleaning up old commits must happen separately from each other. Only then can
Git guarantee that the necessary force-push happens without losing commits.
compress
When using the compress sync strategy, git town sync
first merges the tracking and parent branches and then
compresses the synced branch.
This sync strategy is useful when you want all your pull requests to always consists of only one commit.
Please be aware that this sync strategy leads to more merge conflicts than the “merge” sync strategy when more than one Git user makes commits to the same branch. You can enable these Git settings to prevent this problem:
git config rerere.enabled trueenables Git’s rerere featuregit config rerere.autoupdate trueenables auto-staging of auto-resolved conflicts
config file
In the config file the feature sync strategy is part
of the [sync-strategy] section:
[sync]
feature-strategy = "merge"
Git metadata
To manually configure the feature sync strategy in Git, run this command:
git config [--global] git-town.sync-feature-strategy <merge|rebase>
The optional --global flag applies this setting to all Git repositories on
your machine. Without it, the setting applies only to the current repository.
environment variable
You can configure the sync strategy for feature branches by setting the
GIT_TOWN_SYNC_FEATURE_STRATEGY environment variable.
Perennial sync strategy
This setting specifies how to update local perennial branches with changes from their tracking branches.
options
rebase
When using the rebase sync strategy, (which is the default), Git Town rebases
local perennial branches onto their tracking branch.
ff-only
Git Town fast-forwards the local branch to match the tracking branch. If a fast-forward is not possible, Git Town exits with a descriptive error message. This is ideal when you want an explicit warning about unpushed local commits.
in config file
In the config file the perennial sync strategy is
part of the [sync-strategy] section:
[sync]
perennial-strategy = "rebase"
in Git metadata
To manually configure the perennial sync strategy in Git, run this command:
git config [--global] git-town.sync-perennial-strategy <ff-only|rebase>
The optional --global flag applies this setting to all Git repositories on
your machine. Without it, the setting applies only to the current repository.
environment variable
You can configure the sync strategy for perennial branches by setting the
GIT_TOWN_SYNC_PERENNIAL_STRATEGY environment variable.
Prototype sync strategy
This setting specifies how to update local prototype branches with changes from their parent and tracking branches. When not set, Git Town uses the feature sync strategy.
options
This setting accepts the same options as the feature sync strategy.
config file
In the config file the prototype sync strategy is
part of the [sync-strategy] section:
[sync]
prototype-strategy = "merge"
Git metadata
To manually configure the prototype sync strategy in Git, run this command:
git config [--global] git-town.sync-prototype-strategy <merge|rebase>
The optional --global flag applies this setting to all Git repositories on
your machine. Without it, the setting applies only to the current repository.
environment variable
You can configure the sync strategy for prototype branches by setting the
GIT_TOWN_SYNC_PROTOTYPE_STRATEGY environment variable.
push-branches
This setting determines whether Git Town pushes local branches and commits to the development remote.
config file
[sync]
push-branches = true
Git metadata
To configure whether branches get pushed manually in Git, run this command:
git config [--global] git-town.push-branches <true|false>
The optional --global flag applies this setting to all Git repositories on
your machine. Without it, the setting applies only to the current repository.
environment variable
You can configure whether branches get pushed by setting the
GIT_TOWN_PUSH_BRANCHES environment variable.
Run pre-push hook
This setting determines whether Git Town allows or prevents Git hooks while pushing branches. Hooks are enabled by default. If your Git hooks are slow, you can disable them to speed up branch syncing.
When disabled, Git Town pushes using the –no-verify option. This omits the pre-push hook.
config file
To configure running the push hook in the configuration file:
[sync]
push-hook = true
Git metadata
To configure running the push hook manually in Git, run this command:
git config [--global] git-town.push-hook <true|false>
The optional --global flag applies this setting to all Git repositories on
your machine. Without it, the setting applies only to the current repository.
environment variable
You can configure the push hook by setting the GIT_TOWN_PUSH_HOOK environment
variable.
Sync tags
This setting configures whether to sync Git tags with the development remote.
options
When set to true (the default value), git town sync also pulls and pushes
Git tags in addition to branches and commits. When set to false,
git town sync does not change Git tags at the local or remote Git repository.
in config file
In the config file syncing tags can be set like this:
[sync]
tags = true
in Git metadata
To manually configure syncing tags in Git, run this command:
git config [--global] git-town.sync-tags <true|false>
The optional --global flag applies this setting to all Git repositories on
your machine. Without it, the setting applies only to the current repository.
environment variable
You can configure whether Git Town syncs Git tags by setting the
GIT_TOWN_SYNC_TAGS environment variable.
Sync with upstream
This setting configures whether to pull in updates from the upstream remote.
This is intended for codebases that are forks of other codebases and want to
stay in sync with the codebase they are forked from.
options
When set to true (the default value), git town sync also updates the local
main-branch with changes from its counterpart in the
upstream remote. When set to false, git town sync does not pull in updates
from upstream even if that remote exists.
in config file
In the config file syncing with upstream can be set like this:
[sync]
upstream = true
in Git metadata
To manually configure syncing with upstream in Git, run this command:
git config [--global] git-town.sync-upstream <true|false>
The optional --global flag applies this setting to all Git repositories on
your machine. Without it, the setting applies only to the current repository.
environment variable
You can configure whether Git Town syncs with the upstream repo by setting the
GIT_TOWN_SYNC_UPSTREAM environment variable.
Offline mode
If you have no internet connection, certain Git Town commands that perform network requests will fail. Enabling offline mode omits all network operations and thereby keeps Git Town working.
This setting applies to all repositories on your local machine.
set via CLI
To put Git Town into offline mode, run git town offline.
Git metadata
git config --global git-town.offline <true|false>
environment variable
You can configure offline mode by setting the GIT_TOWN_OFFLINE environment
variable.
Branch lineage
Configuration entries of the form git-town-branch.<branch>.parent=<branch>
store the parents of Git branches. You can ignore these configuration entries,
Git Town maintains them as it creates and removes feature branches.